Introduction
AI has been working its way ever more deeply into our day-to-day jobs. In the field of software testing, new AI-related testing tools and methods are emerging one after another. Previously we introduced a case of AI-driven testing combined with an mcp server; in this article we will introduce a domestically developed AI testing tool that has recently come to prominence, Midscene.js.
Introduction to Midscene.js
MidScene.js is an open-source AI automation testing tool released by the web-infra team at ByteDance. Built on multimodal large models, it understands our natural-language instructions through intelligent visual parsing of the page and then carries out automated operations. It can significantly reduce the complexity of writing automated test scripts, adapt better to changes in page structure and elements, and greatly improve the stability of automated test scripts.
Official website: https://midscenejs.com/
How Midscene Works
Unlike the mcp server we discussed earlier, which used a general-purpose large model to understand the page and extended capabilities by calling local tools, Midscene uses multimodal large models such as ChatGPT-4o, qwen-vl, and ByteDance’s UI-TARS-that is, large models that support visual input-to understand the page, which is much closer to the way we actually perform functional testing.
MidScene first captures the current page screenshot along with detailed page structure information, then submits them together with the user instruction to the large model, which determines the location of the page control to be operated and decides the next action.
Take entering “Today I will learn Playwright” into the task box on a to-do page as an example:
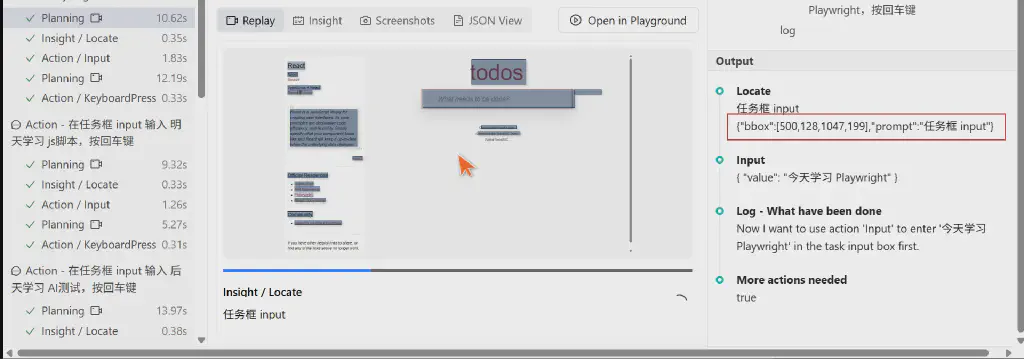
MidScene’s internal operations are roughly as follows:
- Get the user instruction “Enter Learning Playwright in the task box and press Enter”
- MidScene takes a screenshot and obtains the overall element structure of the page
- Submit it to the large model to extract page features
- Obtain the large model’s analysis result and determine the next operation type (Tap) and the specific position (coordinates) of the control
- Plan the next operation
- Complete the execution
Choosing a Large Model
From the analysis of Midscene’s principles above, MidScene mainly relies on the following capabilities of multimodal large models
- The ability to understand screenshots and plan operation steps.
- The ability to give the coordinate information of a specified element (Visual Grounding).
The large models that support the above capabilities, as currently listed on the official site, include the following:
- OPENAI GPT-4o
- Alibaba Qwen-2.5-VL
- ByteDance UI-TARS
- ByteDance Volcano Engine Doubao-1.5-thinking-vision-pro
- Google Gemini-2.5-Pro
In terms of how it works, information such as screenshots and page structure has to be supplied to the large model, so the token consumption is fairly considerable. According to the official assessment, each operation usually consumes at least several thousand tokens. Among them, the model with the best cost-performance ratio recommended by the official team is QWen-VL.
Using the Chrome Extension
The no-code Chrome extension approach can help us quickly understand how MidScene is applied.
You can install it directly from the Chrome Web Store Midscene Extension
Configuring the Large Model
After enabling the extension, you need to configure the large model to use. Here we use the Alibaba Qwen multimodal model qwen-vl-max-latest, which consumes relatively few tokens; you can apply for the corresponding API Key through the Alibaba Cloud Bailian platform, and applications currently come with a free quota of 1 million tokens.

After the application is complete, configure the corresponding large model parameters in the extension’s model settings screen; the Qwen model requires the following four parameters
| |
Operating the Browser
Next you can experience Midscene’s control of the browser in the extension interface. It mainly supports four behaviors:
- Action: Corresponds to AI-planned operations; Midscene automatically plans the operation steps and executes them. It is smarter but slower, and the results depend on the quality of the large model.
- Query: Extracts data directly from the UI and, with the reasoning ability of multimodal AI, achieves intelligent extraction
- Assert: Describes an assertion condition in natural language and lets the AI judge whether the condition is true
- Tap: Corresponds to an immediate page-click operation; Midscene executes it directly, and the large model only handles low-level tasks such as element locating. It is more efficient and is suitable when the operation to perform is already determined
We can enter prompt instructions using AI prompts close to natural language; for different behavior modes, the extension drives the browser to perform different operations and reports the results.
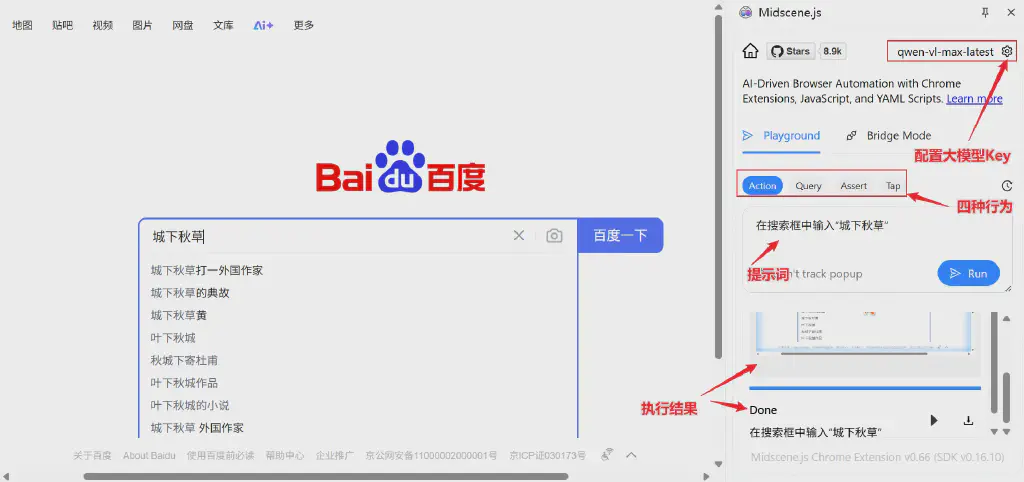
The concrete execution process can also be seen in the video demo below.
Script Integration
Besides calling Midscene through the browser extension, the more recommended approach is to integrate Midscene capabilities through test framework scripts.
With script integration, you also need to configure the relevant model call parameters, the same variable values configured in the extension, except that the relevant variables need to be set as system environment variables
Because Midscene is a JS-based tool, integrating it with a test framework here also requires JS support. Here we take Playwright as an example
Installation
First, of course, you need the Playwright framework; enter the project directory, initialize and install Playwright, then install Midscene
| |
Playwright Framework Configuration
In the playwright.config.ts file, configure the framework’s test discovery directory and test scripts, load environment variables, and set basic configurations such as browser type and execution strategy
| |
Test Scripts
Import the Midscene library through a separate fixture script
fixture.ts
| |
Write a script to test the https://todomvc.com/ to-do list sample project, using API methods such as .ai, .aiTap, .aiQuery, and .aiAssert, corresponding to the four typical operations mentioned earlier.
todo_spec.ts
| |
Run the script:
| |
The execution process can be seen in the video I recorded
【】
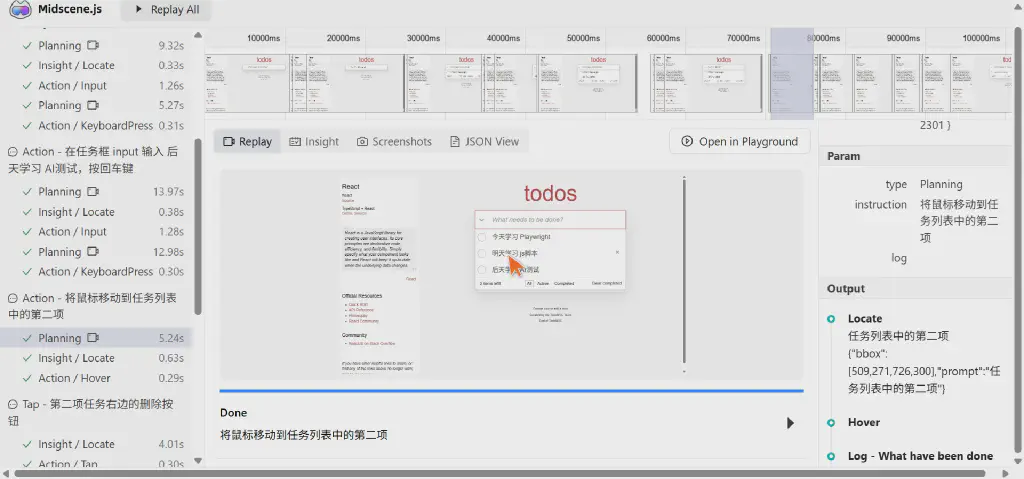
Visual Result Report
The report is one of Midscene’s highlights. Through it you can replay the entire execution process, with detailed display of the AI’s spatial judgment process and concrete operation details, making it easy to debug and optimize scripts.
YAML File-Driven
Besides integration through test framework scripts, Midscene also supports writing test scripts directly with YAML files, enabling no-code script driving, similar to the keyword-driven approach of traditional automation.
In essence, this approach still converts the corresponding keywords into the relevant APIs supported by Midscene for driving.
A format like the following, operating a weather website:
| |
To run YAML-format scripts, you need to install Midscene’s command-line support
| |
MCP Approach
Beyond the methods above, Midscene also offers a way to act as a local MCP server. This approach essentially wraps MidScene’s Chrome extension as a local capability inside MCP, then drives the browser by combining a large model with the mcp server.
For an introduction to and usage of mcp server, see my earlier related article 【】
mcp server configuration:
| |
Limitations of the Current Version
Although the Midsence tool has already shown considerable potential and is still being continuously updated and iterated, it still has quite a few shortcomings in practical use, mainly in the following areas:
- Limited interaction types: Currently only click, drag (supported only in the UI-TARS model), input, keyboard, and scroll operations are supported.
- Stability risks: The return values of AI models cannot be guaranteed to be 100% accurate. Writing good prompts is demanding
- Element recognition: Some large models are not very good at recognizing elements, such as interactions with iframe and canvas elements. Moreover, Chrome’s native controls like pop-up prompts and right-click menus are not yet supported.
- Higher cost: Being based on visual recognition, token consumption is considerable, and if a paid large model is used, the cost can be high.
But these flaws do not overshadow the merits: Midscene has already taken a solid step forward in improving UI automation testing with AI capabilities! We will continue to follow its further development!
Further Reading:
【】 【】
Join the group, outline