Preface
In the previous article 【】, we introduced Bruno, an up-and-coming API testing tool that has been attracting wide attention on GitHub, offering a great alternative for those tired of Postman’s mandatory online-usage restriction.
The core strengths of Bruno, as highlighted on its official website, are as follows:

- A commitment to being open source and extensible, focusing exclusively on the client and never expanding the product into a “platform”.
- Collaboration and version management built on Git
- Offline use, never syncing local data 😂😂😂
In this series, we will walk through a detailed, hands-on tutorial on API interface testing using Bruno. This is the first article, focusing on the following topics:
- Bruno installation and an overview of the interface
- Methods for implementing typical API operations with the GitHub API
- Environment management
- Authentication mechanisms and encryption
Bruno Installation and Interface Overview
Installation
| |
Using the Interface
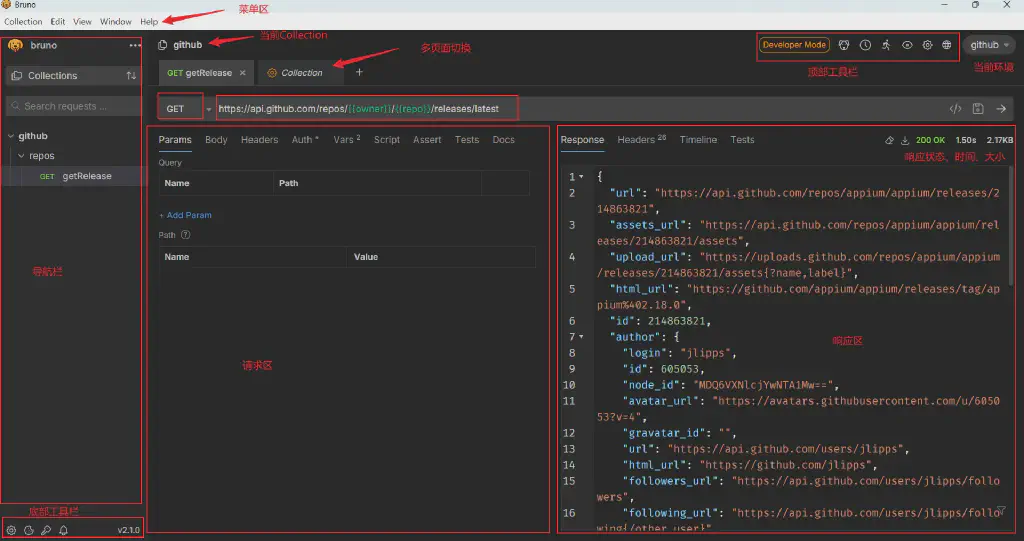
Left panel: Collection management and navigation (similar to a project structure in an IDE)
Central area: the request editor (URL / Headers / Body configuration)
Right panel: response results display (content, status, assertions, etc.)
Toolbar: the top mainly holds some advanced feature settings (paid version) and variable management (global, environment); the bottom toolbar holds system-level settings for the tool (interface, proxy, authentication, etc.), as well as cookies and license management
Keyboard shortcuts:
Ctrl +E: environment variable settingsCtrl + B: create a new requestCtrl + Enter: send the request immediately
Implementing Typical HTTP API Testing (GitHub API)
Below, using the official GitHub API, we will show how to carry out typical HTTP API request testing in Bruno.
Introduction to the GitHub API
GitHub is a hosting platform for open source software projects. Because it uses Git as the sole repository format for hosting, it is named GitHub. It is also the largest code hosting platform in the world today, arguably a holy land for programmers, and jokingly known as the world’s largest same-sex dating platform
The GitHub API currently has two versions: one is the GraphQL-based V4 version, while the more commonly used one is still the earlier Restful API, whose Restful API definition has long been regarded as a model for this kind of interface.
For the detailed interface documentation, see https://docs.github.com/zh/rest?apiVersion=2022-11-28
The Time Format in GitHub
YYYY-MM-DDTHH:MM:SSZ
GitHub Rate Limiting Rules
To protect server load, GitHub limits request traffic. Every GitHub response header carries GitHub’s rate limit settings.
| Header Parameter | Meaning |
|---|---|
| X-RateLimit-Limit | The maximum number of requests per hour; generally 60 for unauthenticated requests and 5000 for authenticated requests |
| X-RateLimit-Remaining | The number of requests remaining |
| X-RateLimit-Reset | The time when the remaining limit resets, in milliseconds |
Request Parameters and Pagination
Requests can carry parameters, generally of two types: path parameters and query parameters

The GitHub API supports two pagination parameters by default:
- page the current page number to display
- per_page the number of results per page
GitHub Request Token
From the GitHub account settings page, add a Token configuration for accessing the API
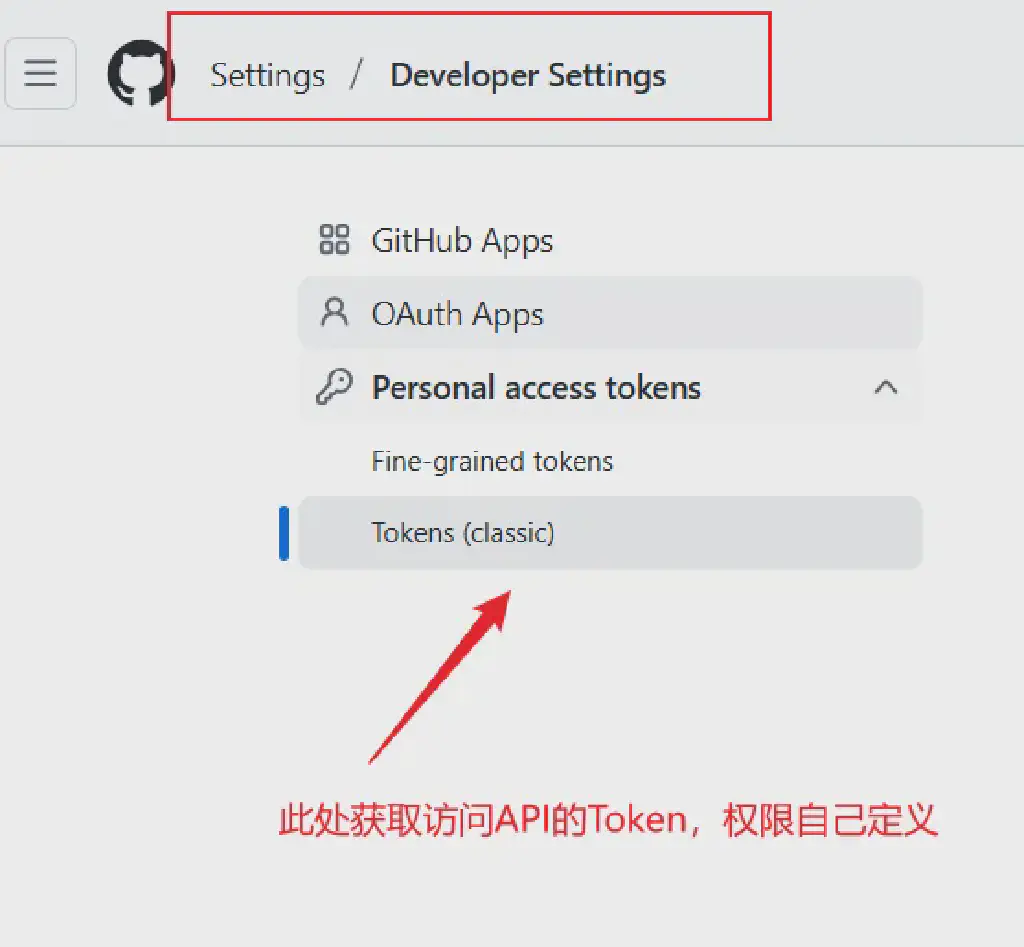
Configuring Token Authentication
In Bruno, create a new Collection and name it github. In its Auth section, add the API token you configured earlier, and select bearer Token as the authentication method here
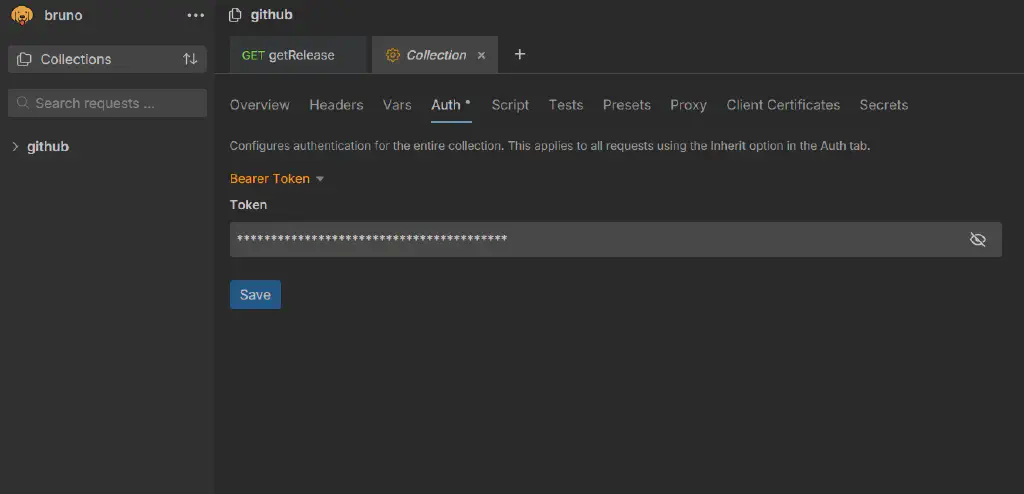
Besides bearer Token, Bruno also supports a variety of other authentication methods, covering basically all authentication patterns of various API interfaces.
- AWS Sig: an authentication method for signed AWS public cloud users of Amazon
- Basic auth: basic authentication, by entering an account and password
- WSSE auth: Web Service security user authentication
- Bearer Token: a security authentication token based on encrypted text
- Digest auth: digest authentication
- NTLM auth: Microsoft’s LAN management authentication protocol
- Oauth 2.0: an open authorization protocol, a commonly used protocol for third-party authentication
- API Key: an access token defined by the server itself
- no Auth: no authentication
- inherit: inherit the authentication from the parent level (in Bruno, a child request can use the authentication settings of its parent)
CRUD Operations in API Testing
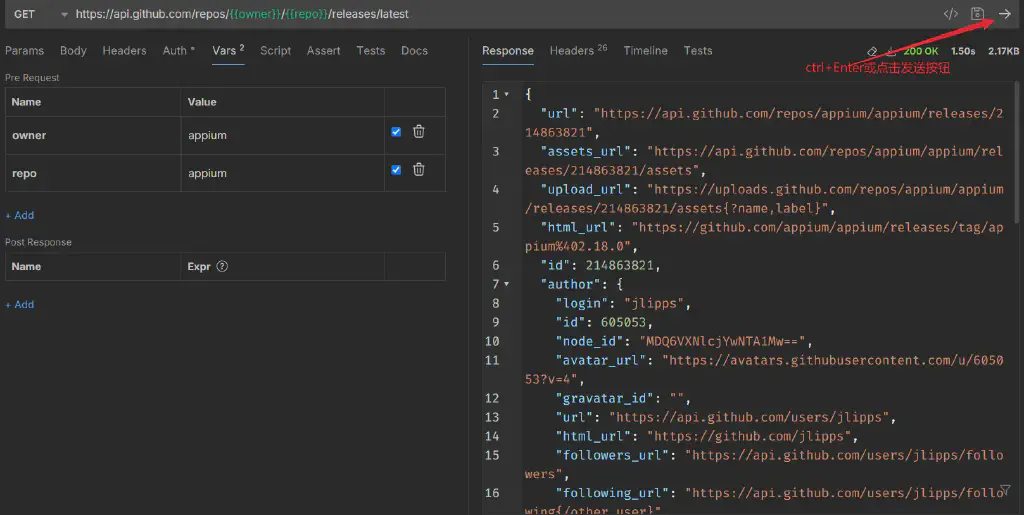
1. GET Request — Get the Latest Release of a Specified Project
Target interface: GET /repos/{owner}/{repo}/releases/latest
In Bruno, {{var}} lets you specify variables in a request, with the variables configured as follows. After clicking the send button, a response is successfully obtained.
The authentication method for this request uses inherit, inheriting the bearer token authentication configured in the collection
2. POST Request — Create an Issue
Target interface: POST /repos/{owner}/{repo}/issues
Creating an issue corresponds to the POST method, configured in Bruno as follows,
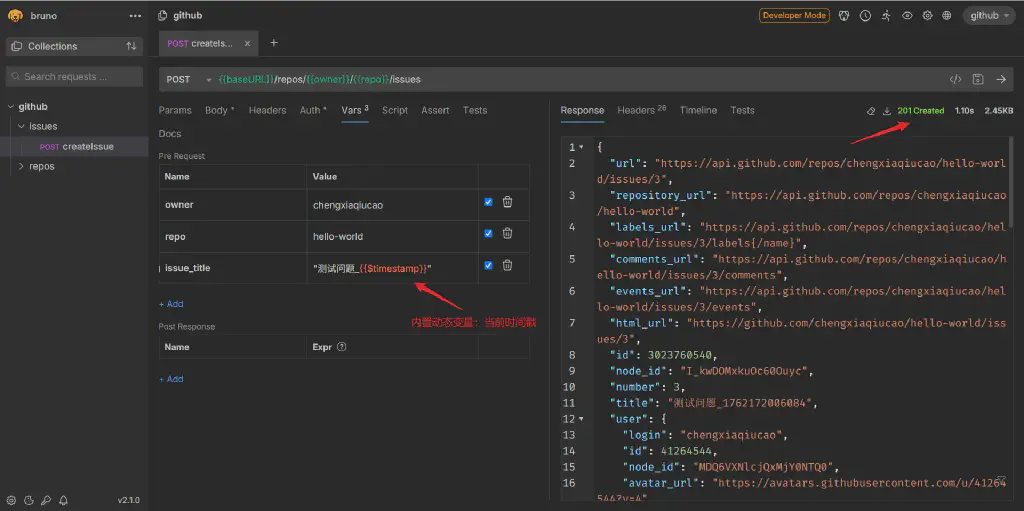
Body configuration:
1
2
3
4
5
6
7
{ "title": {{issue_title}}, "body": "Found a test issue", "labels": [ "bug" ] }Dynamic variable injection:
For the issue title here, we use Bruno’s built-in dynamic variable
{{$timestamp}}. Bruno provides a rich set of built-in dynamic variables, which makes it extremely convenient for us to dynamically simulate request data.1 2 3# Preset title variable vars: issue_title: "Test_Issue_{{$timestamp}}"
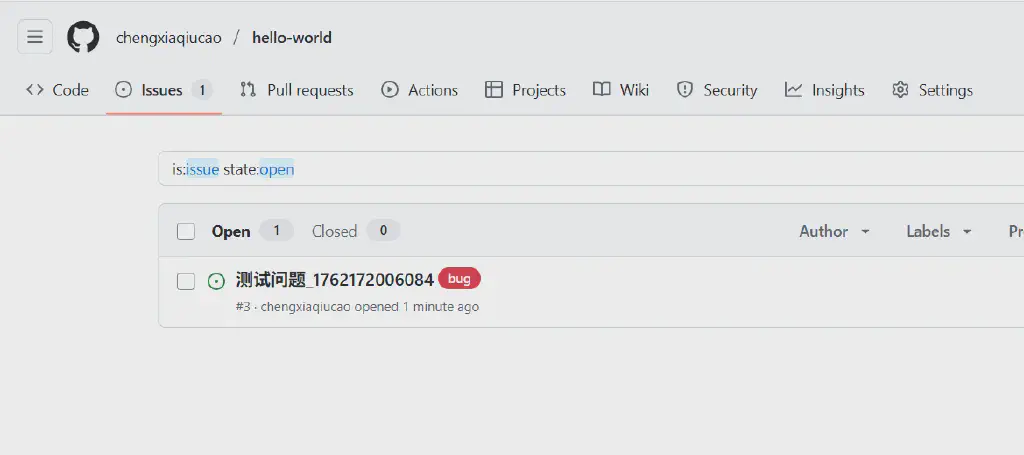
Check on GitHub, the Issue has been created
3. PATCH Request — Modify an Issue
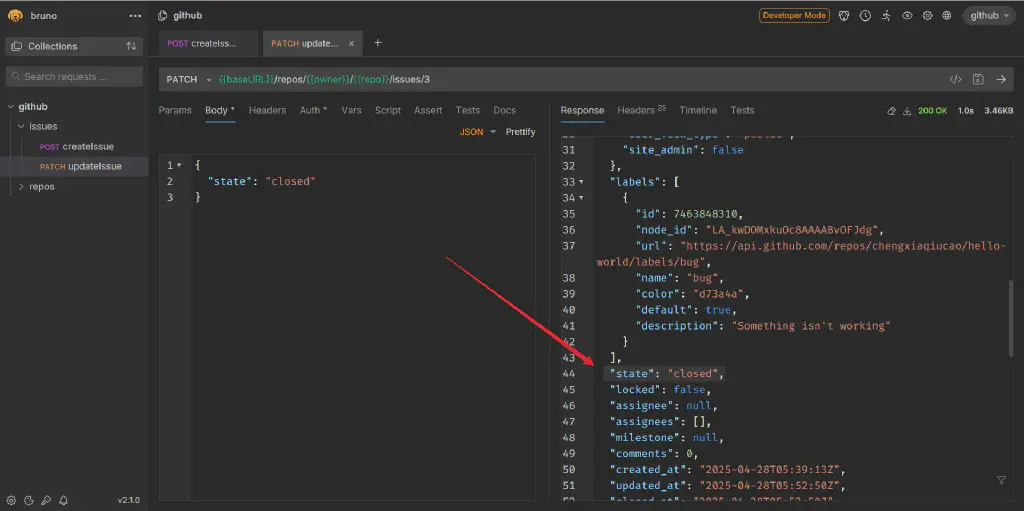
Target interface: PATCH /repos/{owner}/{repo}/issues/3
Close the issue whose issue_number is 3
| |
4. DELETE Request — Delete an Issue Comment
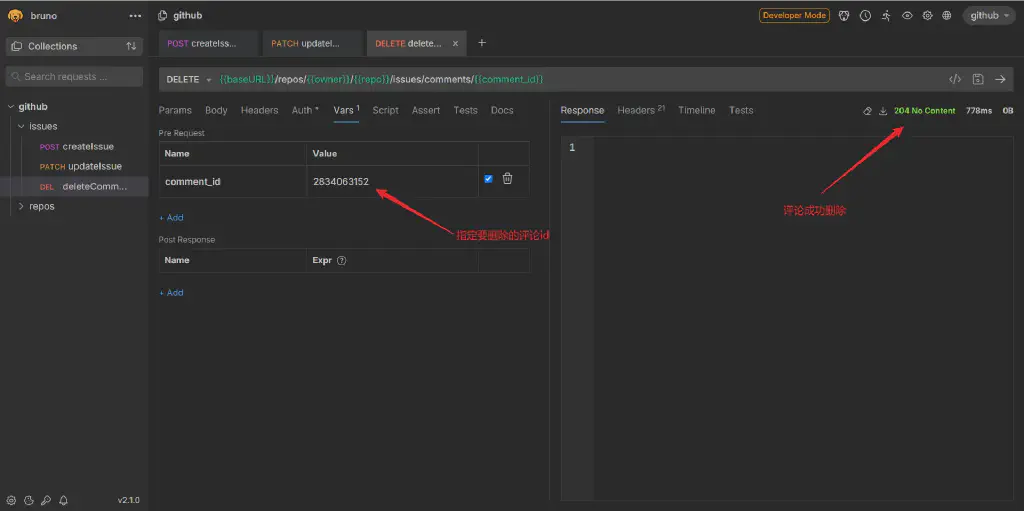
Target interface: DELETE /repos/{owner}/{repo}/issues/comments/{comment_id}
Basic Test Assertions
Test Script Validation — Status Code
In Bruno, you can write Test scripts to validate results, similar to Postman
| |
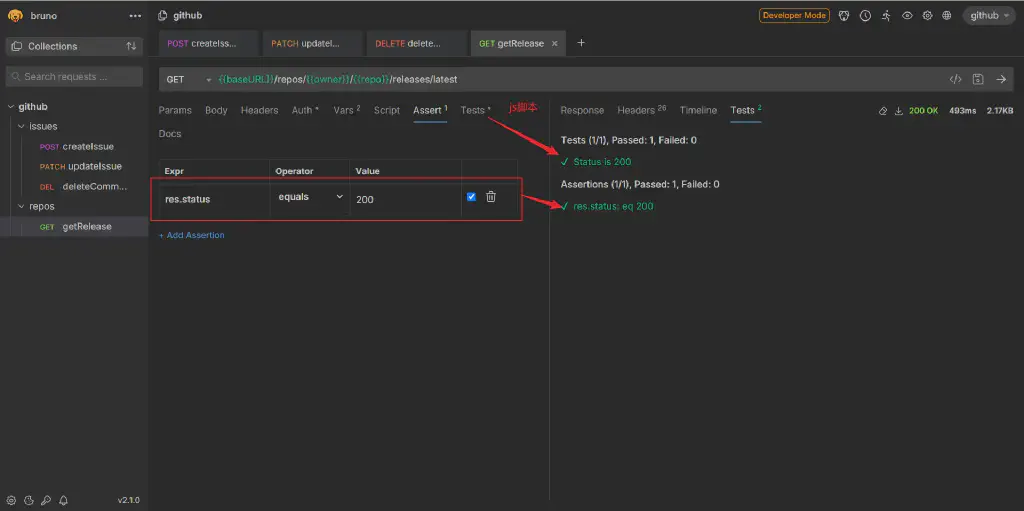
Interface Assert
For some commonly used assertions, Bruno also lets you add Assert directly in the interface to perform assertions.
The results of the above Test and Assert executions are as follows
The above is an introduction to the main basic feature usage when performing API testing with Bruno. Further advanced usage will be updated in follow-up posts. Everyone is also welcome to join the testing discussion group to continue in-depth exchanges with fellow testers. Reply with join the group to get an invitation to the group.