
Preface
In our daily work, rapidly deploying and managing development and test environments based on Docker technology has become very common. And for our own product development, we inevitably cannot do without managing many private Docker images. Add to that the difficulty of accessing Docker’s official image registry, and setting up a private Docker image registry in our development environment has become a widespread requirement.
The Basic Method for Building a Private Docker Image Registry - HTTP
The basic method for building a private Docker image registry is actually very simple, and it is also the solution most easily found when searching online.
You simply start its registry image, registry, directly through Docker
| |
–restart Automatically restarts the registry if it fails, ensuring availability –name Sets the registry name –p Maps the internal registry service port 5000 to host port 5100 –v Persists registry storage to a data volume
Once the image is up and running, accessing the v2 endpoint on port 5100 of this host through a browser will normally display an empty json string, indicating that the registry is ready to provide service

But at this point, if we use the docker push command to upload an image to this private registry, we will get a prompt indicating that the default protocol https does not match.

Here we also need to configure Docker to accept the http protocol. On Linux systems this is usually done in the Docker daemon configuration file /etc/docker/daemon.json.
Add the private image server address to it:
| |
If you are using Docker Desktop on Windows, configure it in Docker Engine
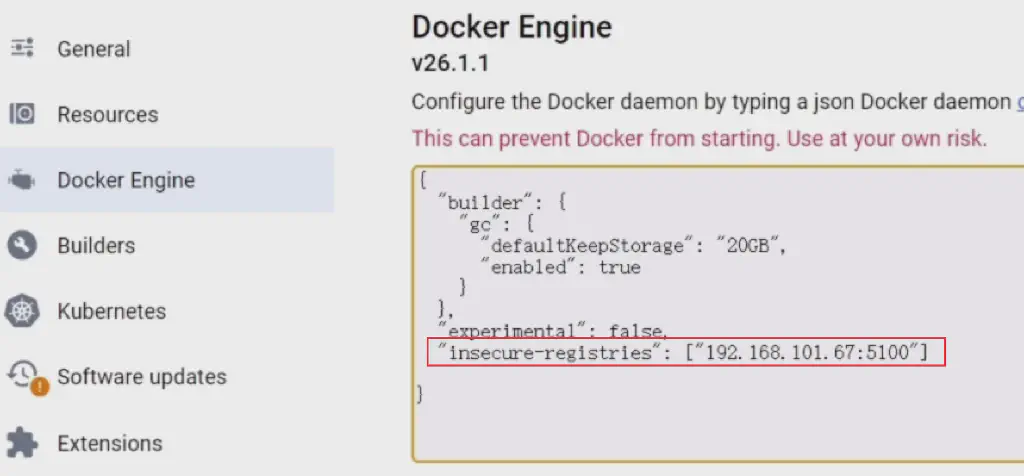
After restarting the Docker engine, you can perform push and pull operations on the private registry you just built normally.
However, although a basic image registry based on the http protocol can meet our everyday basic usage requirements, if our product project is not a small one and involves the coordination of multiple Docker images and multiple nodes, a Docker cluster is generally required.
Docker’s official clustering system, Docker Swarm, is also very simple to use, but in Docker Swarm, for security reasons, access to private image registries is mandatory through the https protocol. Therefore, the focus of this article is still to introduce how to build a private image registry based on the https protocol
Requirements for an HTTPS-Protocol Image Registry
Compared with the http protocol, the https protocol mainly provides protection for transport security. For a detailed explanation of the principles of the https protocol, please refer to my earlier article
A Plain-Language Guide to HTTPS: Understanding the Relationship Between SSL, TLS, and HTTP
Therefore, to build an image registry based on the https protocol, the complicated part is mainly satisfying the authentication and authorization requirements imposed by the https protocol. These mainly include:
- Generate certificates and access keys; non-production environments generally use self-signed certificates.
- Configure the image registry to mount certificates at startup
- Configure access nodes to trust the certificates
- Join the cluster, and push and pull Docker images
Deploying a Private Image Registry in a Cluster
Below, we describe the deployment process step by step in detail
Generating a Self-Signed Certificate
Generating the Root CA Private Key and Certificate
| |
Generating the Server Private Key and CSR
| |
Signing the Server Certificate with the Root CA
| |
The above operations will generate the list of certificates we need
ca.crt: Root certificateregistry.crt: Server certificateregistry.key: Server private key
Configuring the Image Registry
To enable the Registry in a Swarm cluster, you can use docker compose; first configure the compose startup file
docker-compose.yml
| |
Then enable the registry in the cluster through docker stack
| |
In this way, we have enabled a registry that supports authentication
Configuring Access Nodes to Trust the Certificate
But even though the registry supports authentication, to properly authenticate the service when accessing it, there is one more operation on client nodes, namely trusting the registry’s self-signed certificate
| |
Restart the local Docker service to load the trusted certificate
Verifying Image Pull from the Registry
Then, on the client machine, we can pull images through the private registry
There is one more step here: the registry address we configured is qiucao.com, which is not an actually existing public network domain name, so we should also add local resolution for the domain name in /etc/hosts
| |
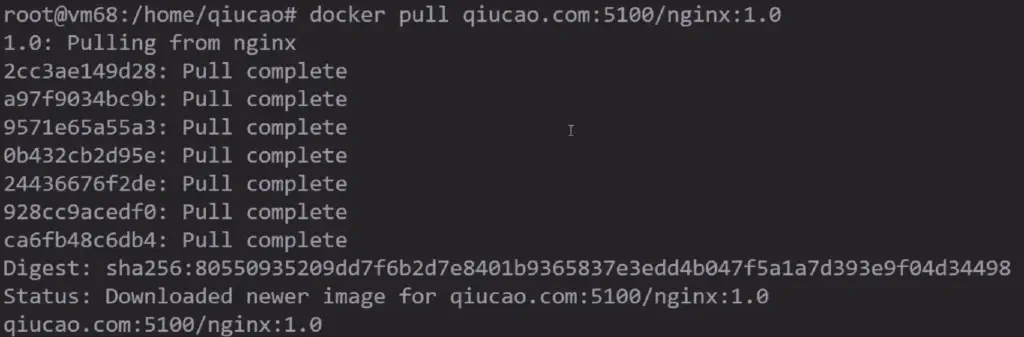
Then run the docker pull command to pull the image from the registry, and the image pull can be completed successfully
For more on using Docker and systematically improving your testing skills, you can learn about my testing course; reply outline for detailed course content.