Introduction
In our previous series, we detailed how to use Postman for API testing, covering basic functions, advanced scripting, and automation implementation. In our work, besides these local testing implementations, we often need to manage API test cases through the cloud and leverage cloud-based capabilities for enhanced testing due to different office locations or team collaboration requirements. In this article, we’ll explore the advanced Cloud services provided by Postman.
Introduction to Postman Cloud Services
To use Postman Cloud services, we first need to register an official account
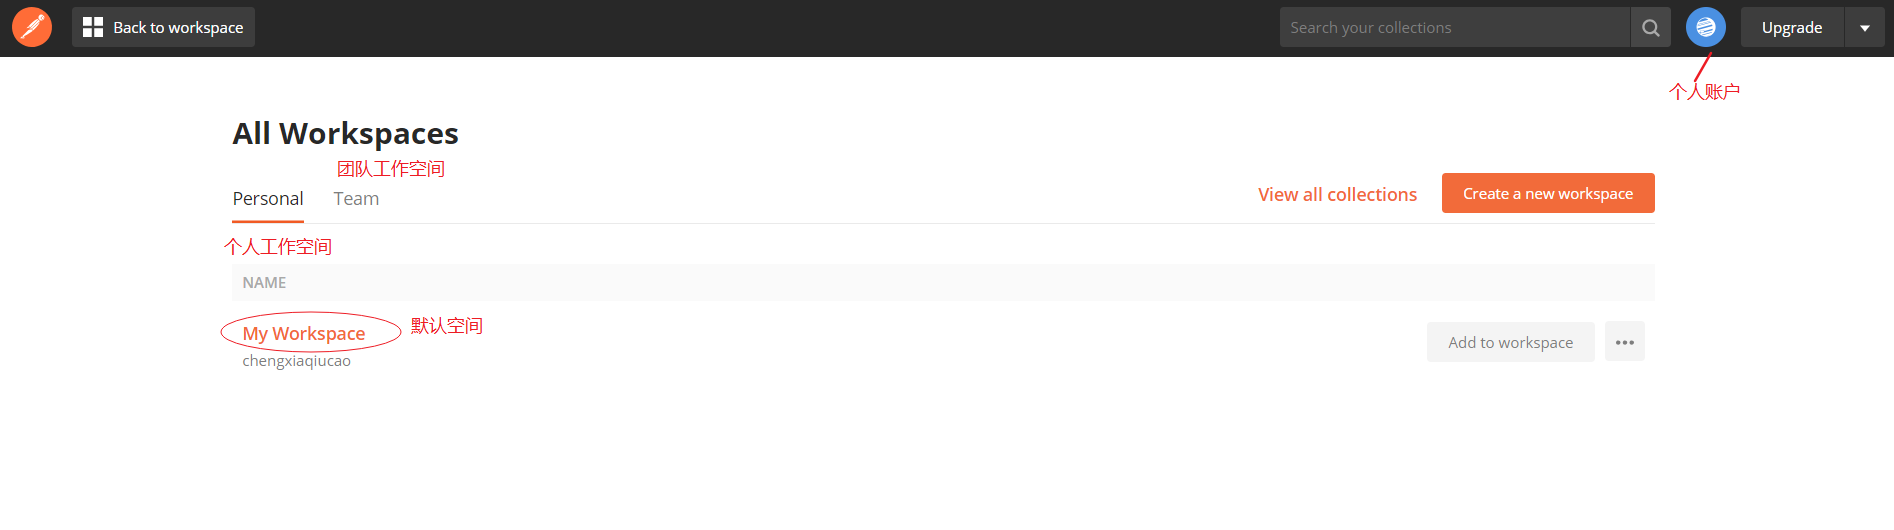
After registration and login, you can access the Cloud management page by clicking the dashboard button in the upper right corner of the official homepage. This will display your workspaces, including your personal workspace and any team workspaces you’ve created for sharing.
Workspace and Cloud Feature Overview
A workspace is a management unit in Postman Cloud. Through cloud workspace synchronization, we can achieve several advantages that aren’t possible with the local application:
Convenient organization and management of personal work across different locations and devices. For example, you can continue unfinished work at home that you started at the office.
Facilitates team collaboration by sharing relevant metadata and team workspaces, allowing team members to jointly maintain the same set of interfaces and share work results.
A unified workspace enables teams to work in the same dimension, avoiding inconsistencies in work progress and data that could lead to misunderstandings and communication gaps.
The workspace history function helps record and trace interface operation records, making it convenient to save work processes and results.
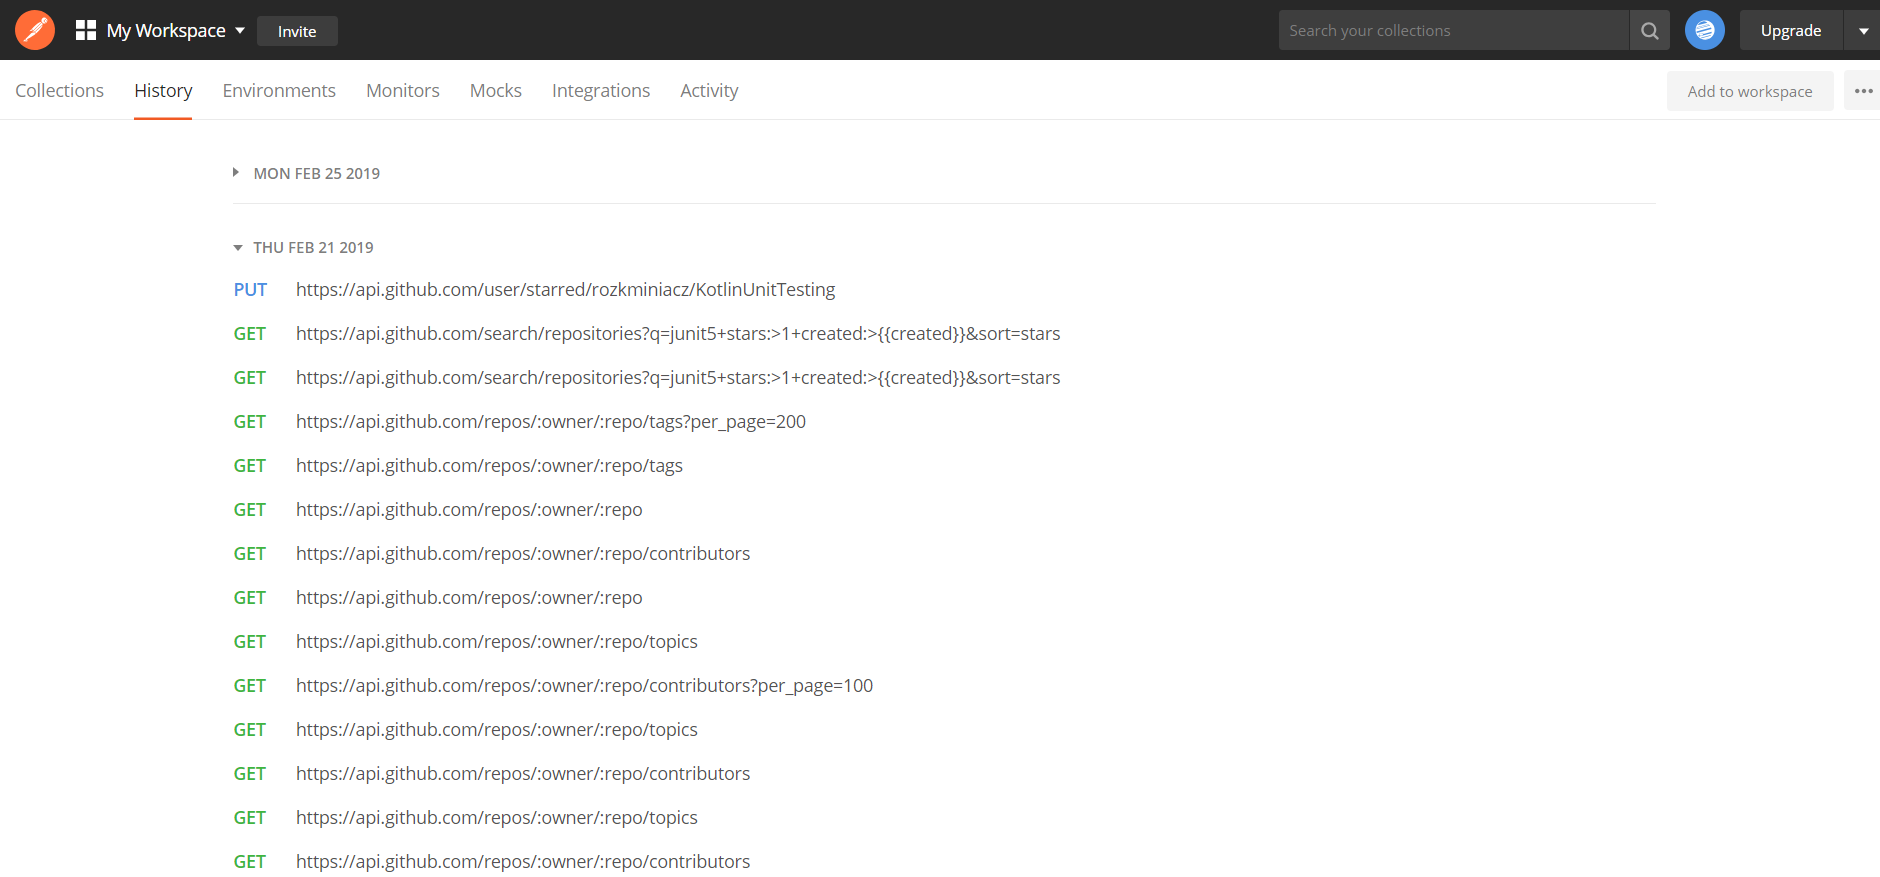
The image below shows the interface after entering a workspace in the Cloud. You can see the functions provided by Postman Cloud. By default, it displays the Collection information in the current space. The other tabs are interface operation history, environment variables, monitoring tasks, Mock services, API integration capabilities, and workspace operation records.
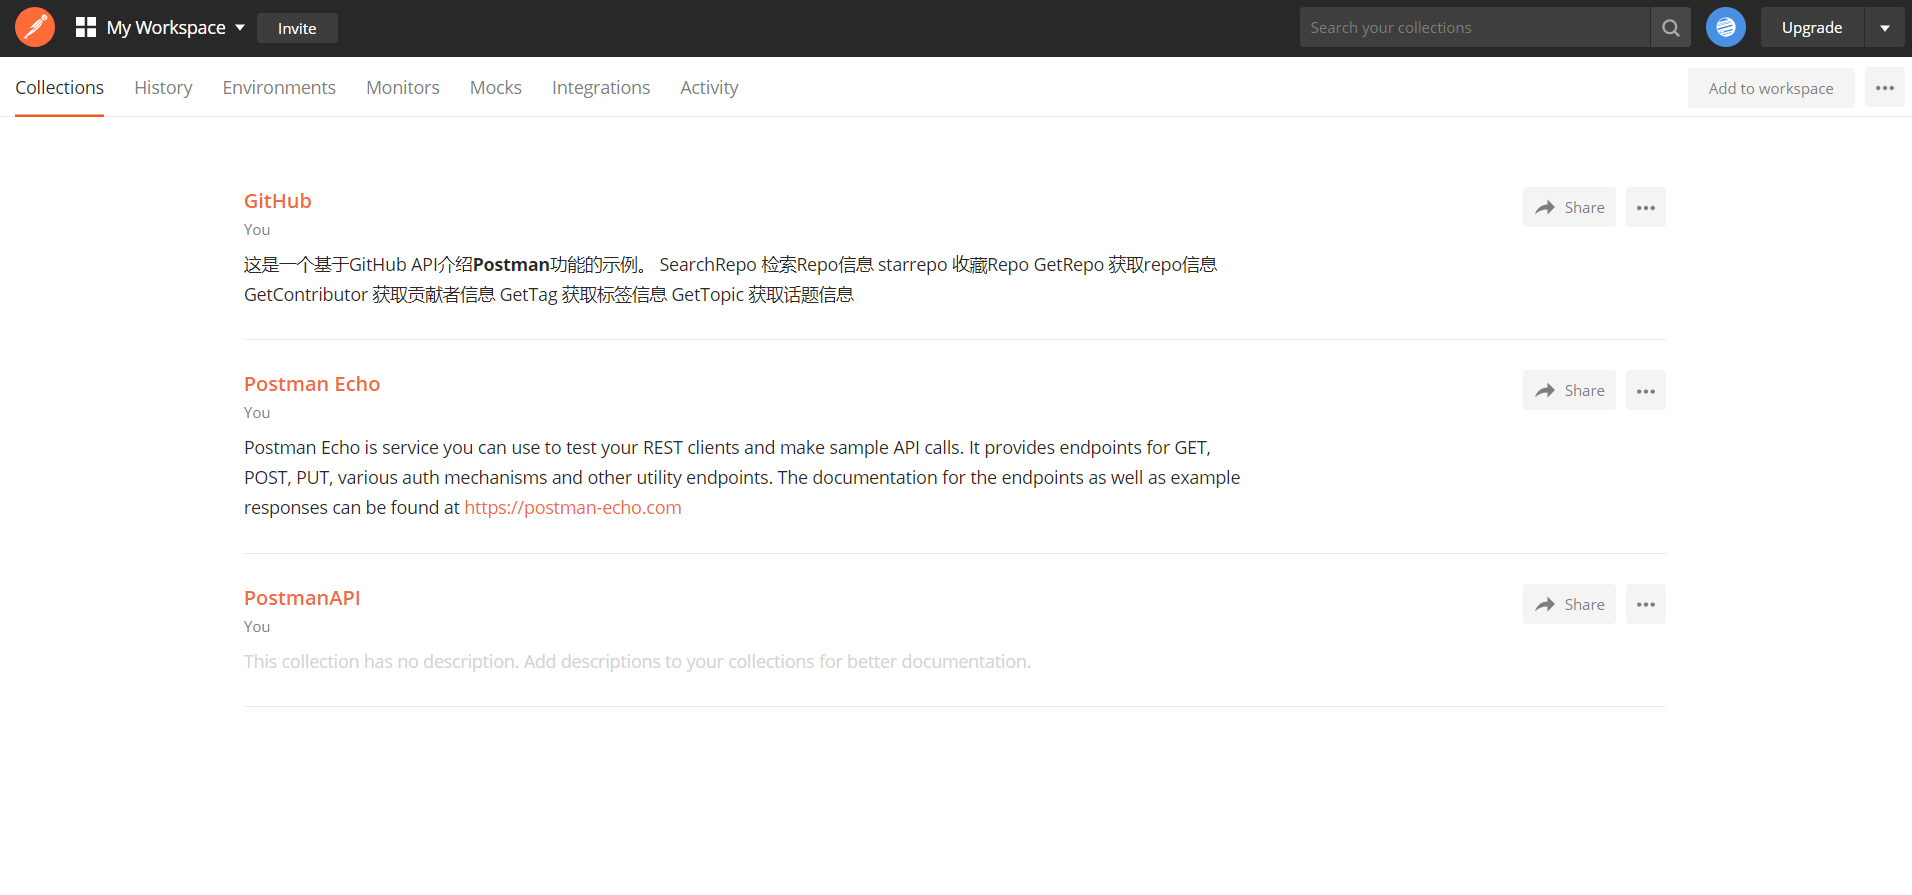
Below are the History interface operation records and Activity workspace operation records:

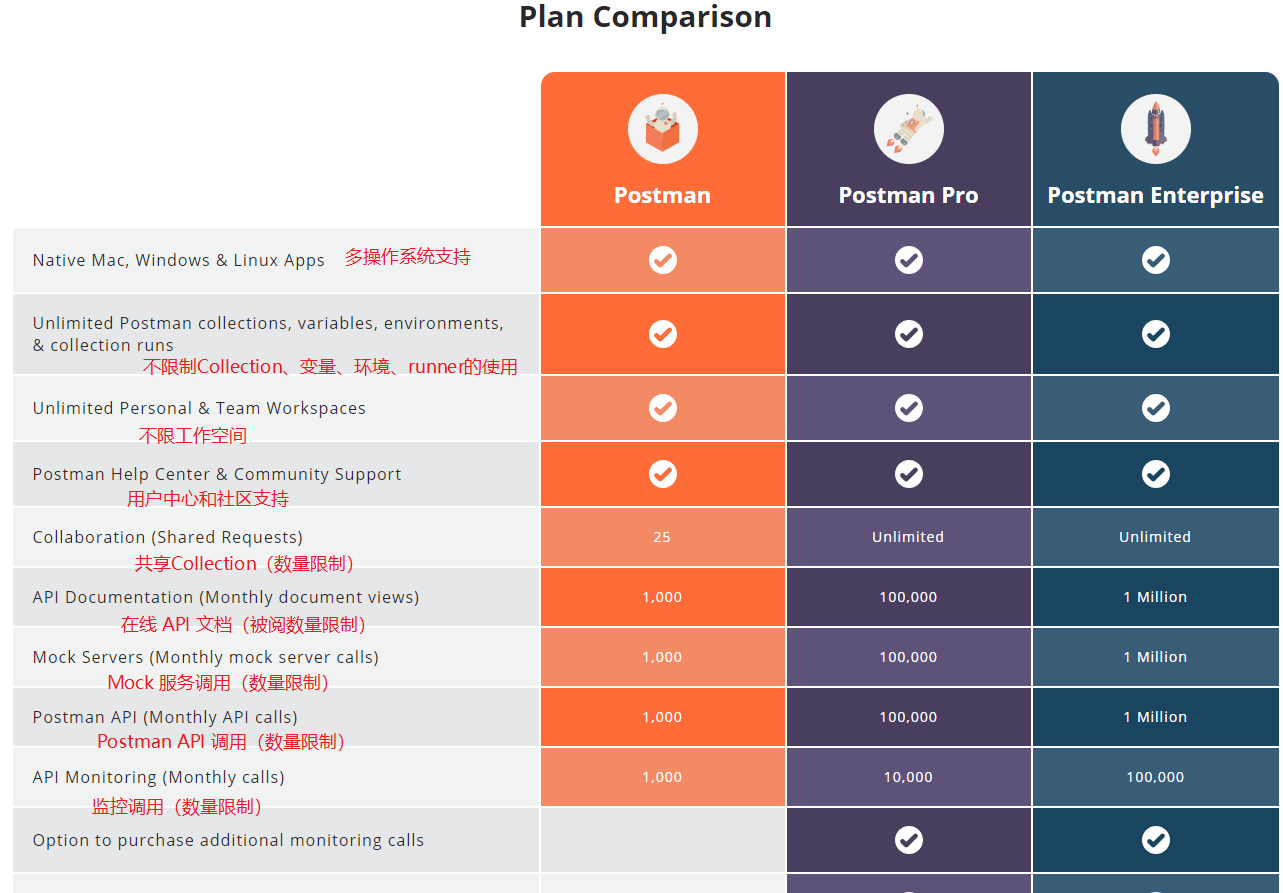
Account System and Pricing
After registering on the Postman website, you have a free account by default, which can be upgraded to Professional or Enterprise versions. The current monthly fees are as follows:
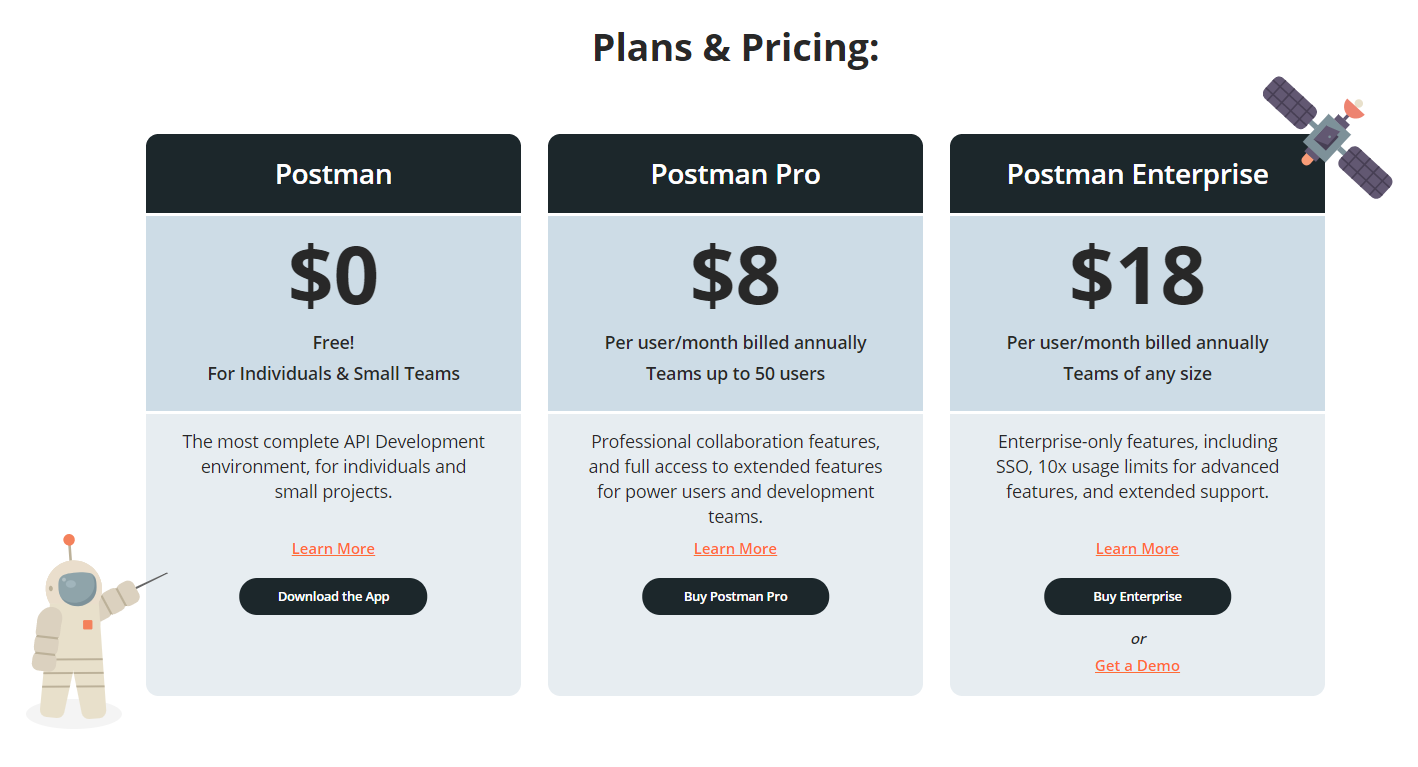
The free version includes the following features. As you can see, most functions are supported, with the main difference being usage limits. Free accounts are limited to 1,000 online document views, Mock requests, API calls, and monitoring calls per month, which can generally meet individual learning and basic testing needs. For larger teams, it’s better to upgrade to a premium version or choose alternative solutions.
Local Application Login
In the Postman application, we can also log in with our registered account. After logging in, the banner at the top will display the default workspace and account avatar.

After logging in, the local app will automatically synchronize with the information saved in the cloud to maintain data consistency. Let’s now look at the services provided by Postman Cloud.
Postman Cloud’s Online API Documentation
Powerful and beautifully formatted online documentation is an important service of Postman Cloud. It has the following main advantages:
- Support for Private and Public Documentation
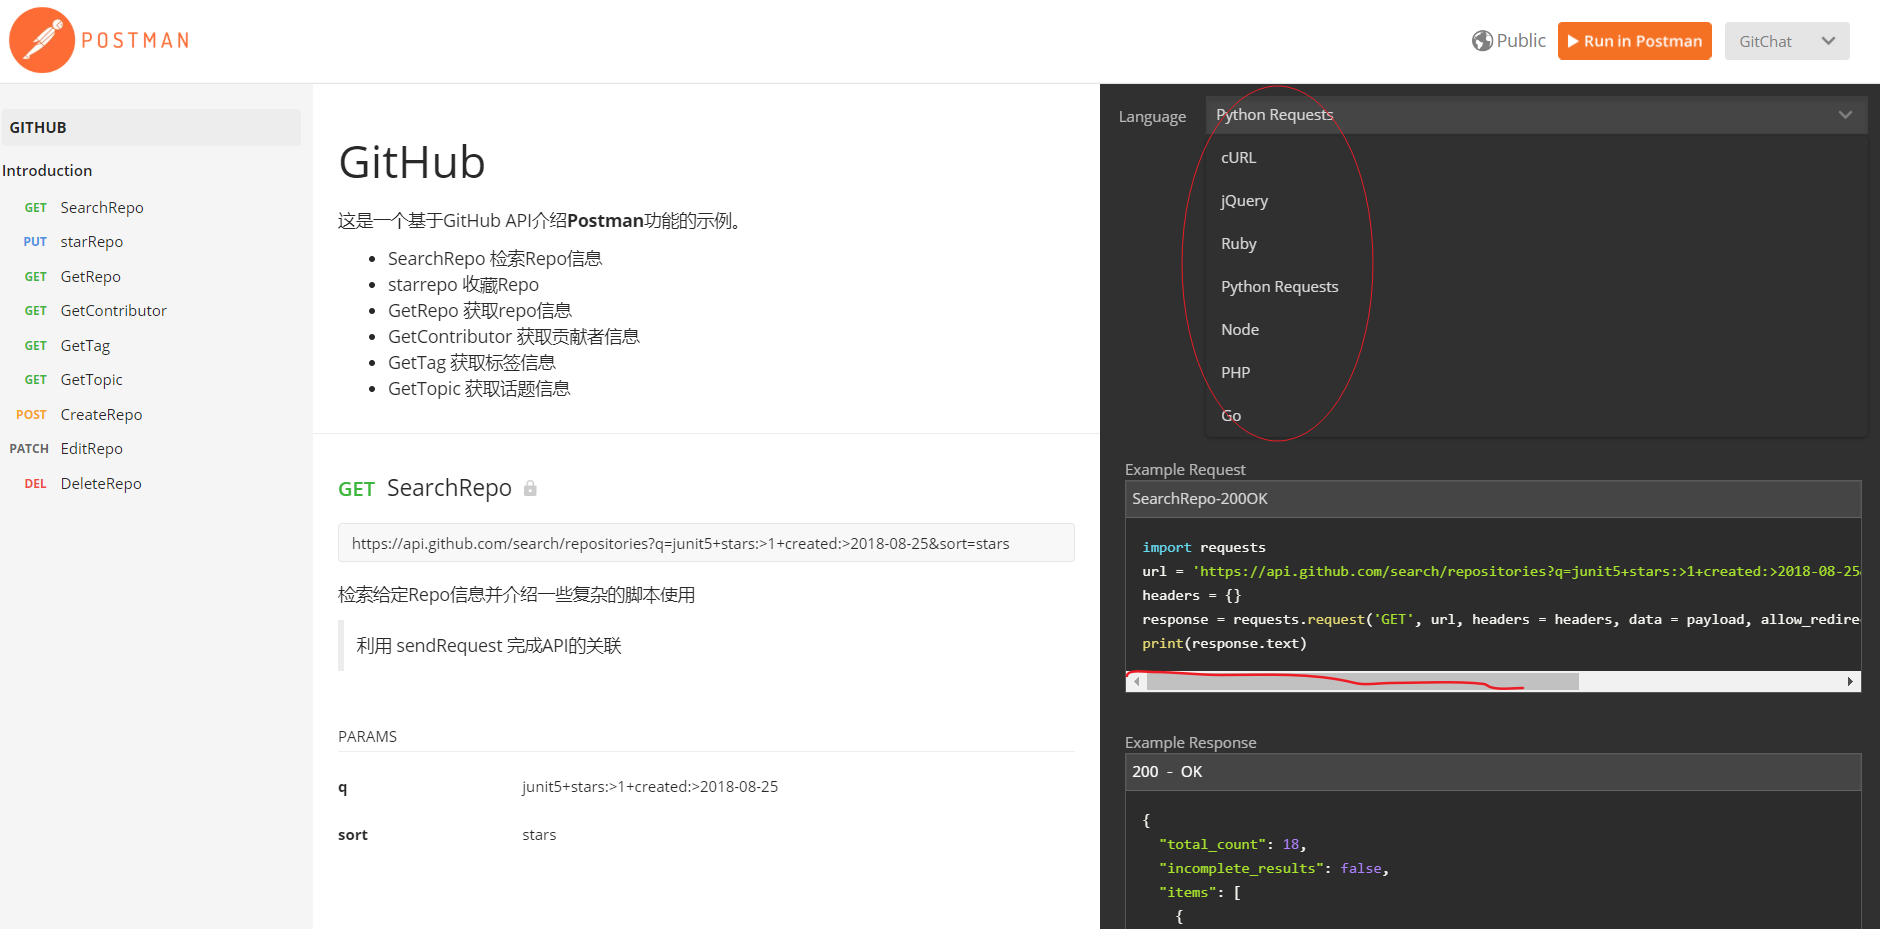
When you register a Postman account, the online documentation feature is enabled by default. After logging into the web workspace and entering a Collection, you can see that the online documentation for the current Collection has been automatically generated, as shown:
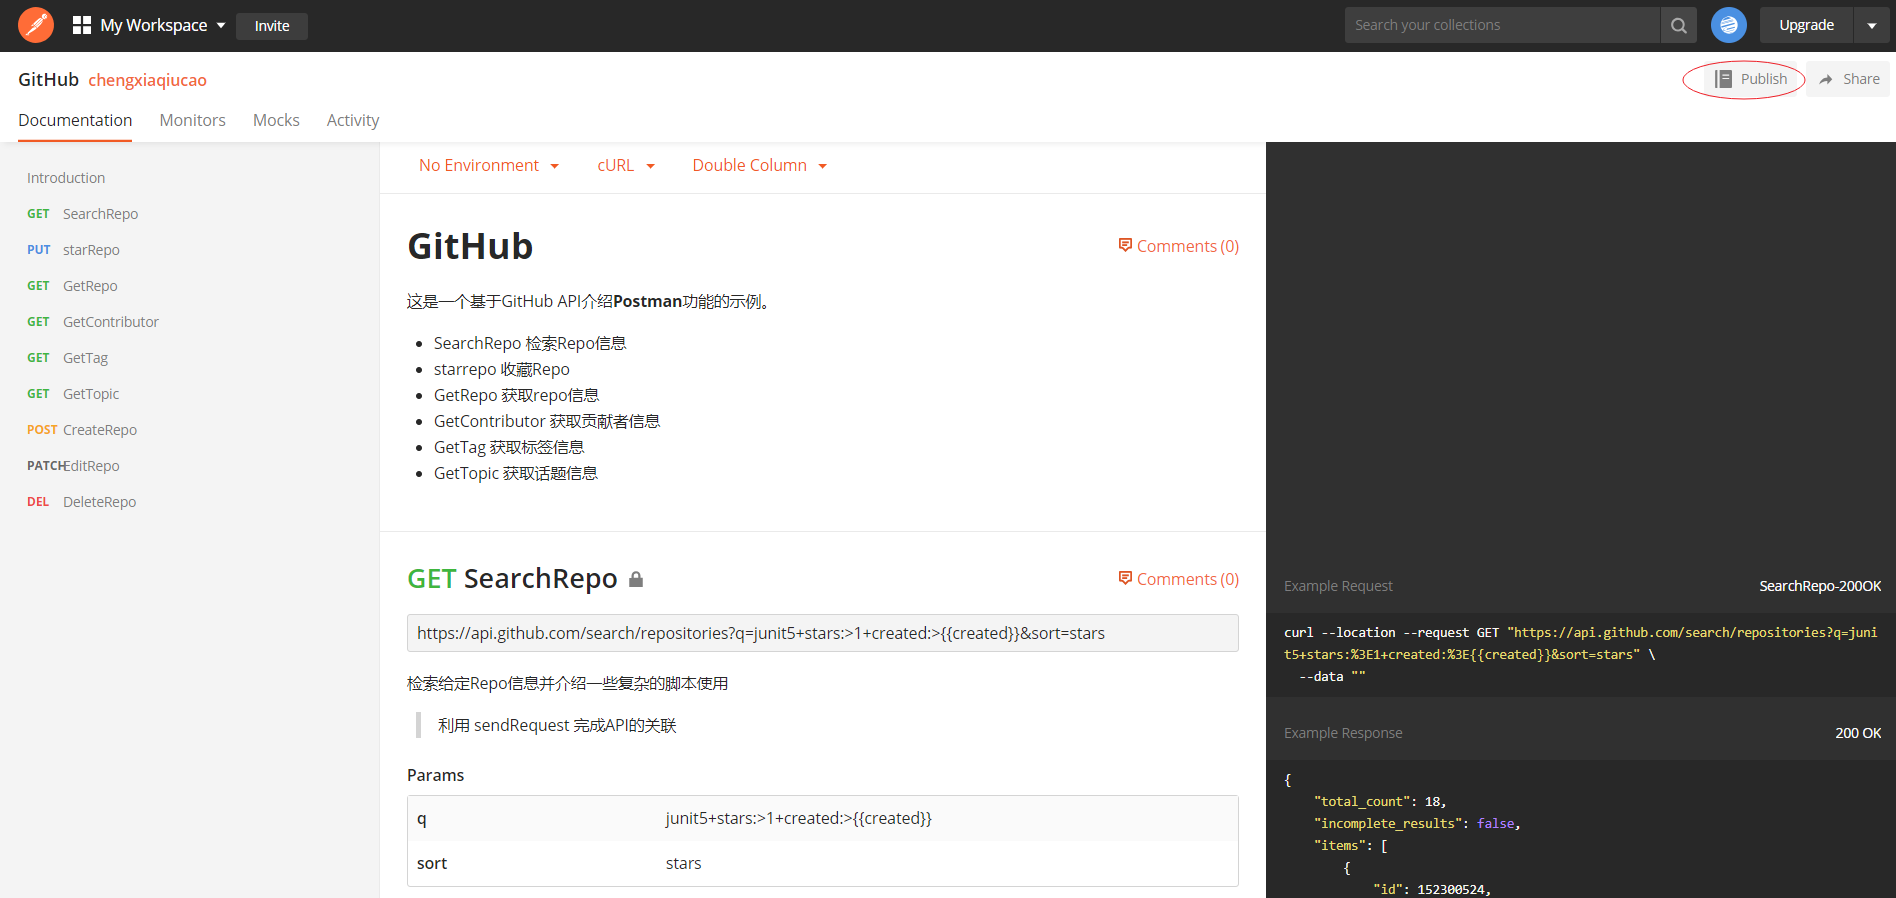
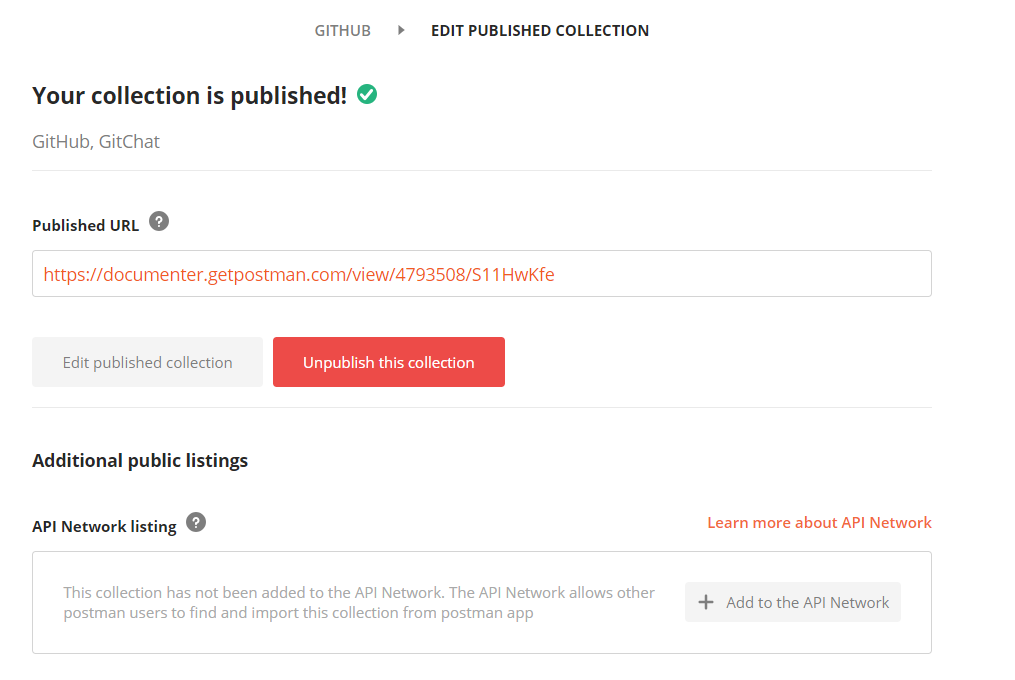
The image above shows private documentation that only the current account can view in the workspace. Using the Share button in the upper right corner, you can share the current documentation with other workspaces or team workspaces. The Publish button allows you to publish the current documentation as public documentation for open access.
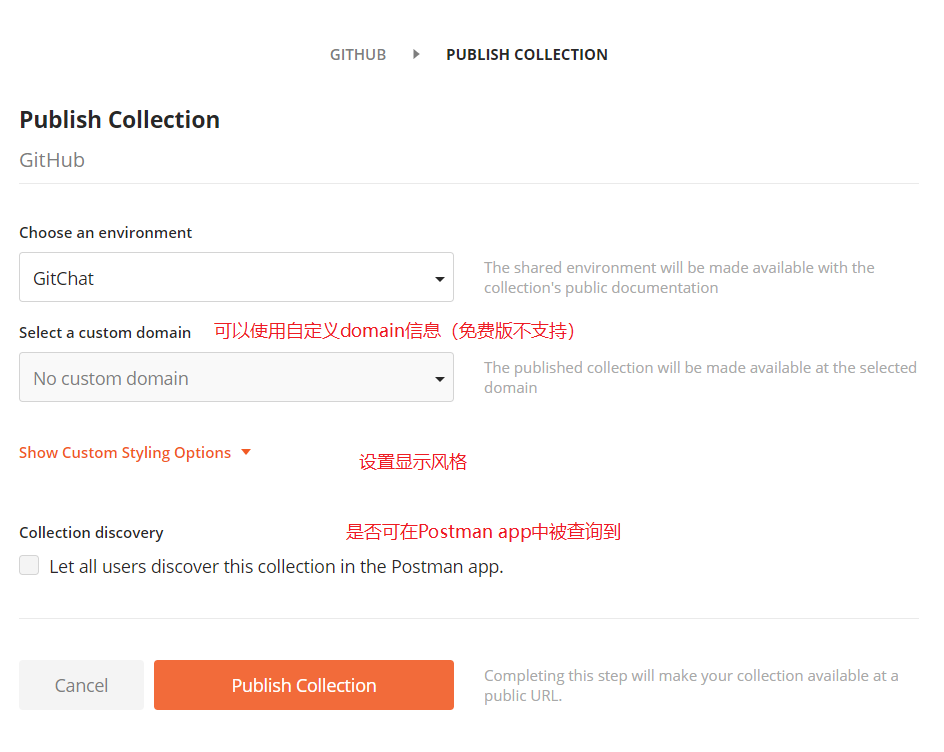
In the Postman app, you can also use the Publish Docs button in the Collection menu to publish public documentation. After publishing, a public access URL will be generated, through which the documentation can be accessed.
- Automatic Documentation Generation
As mentioned above, Postman online documentation is automatically generated, eliminating the previously cumbersome document editing and formatting work. It can automatically generate the following content:
- Request examples, including request method, URI, message content, headers, parameters, etc.
- Interface response information saved as Examples
- Descriptions written for Collections, Folders, and Requests
- Automatically generated code snippets in various mainstream languages
The image below shows the Collection description editing interface:
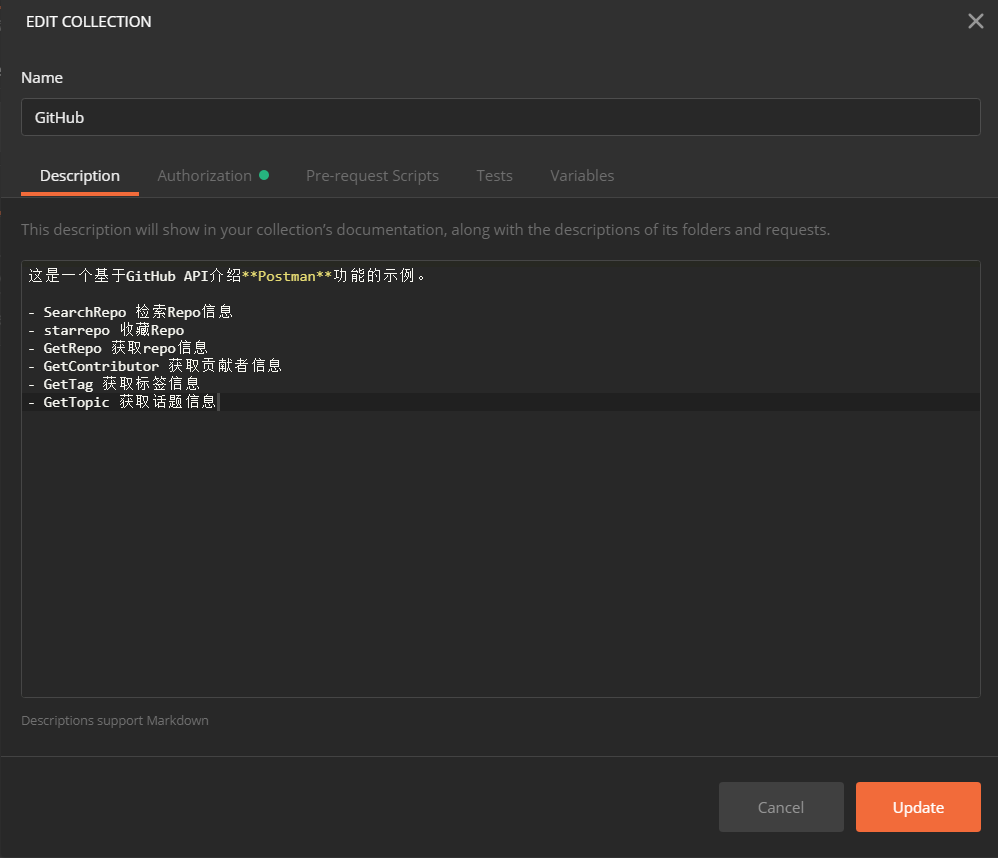
- Support for Markdown Syntax
When writing Descriptions, we can use Markdown syntax, which further enhances the reading experience of the documentation. The image above includes Markdown list and bold syntax.
- Support for ID-Based Internal Links
We can also use the unique IDs generated by Postman for each request and folder for cross-referencing within the documentation. When we click on the corresponding element in the right navigation bar of the document, the unique ID of that element is displayed in the URL, as shown:

Note: ID information can also be obtained through the Postman API interface.
- Support for Automatic Generation of Code Snippets in Mainstream Languages
Another excellent feature of Postman online documentation is its support for code snippets in multiple mainstream languages, which is convenient for debugging code in the respective language. As shown:
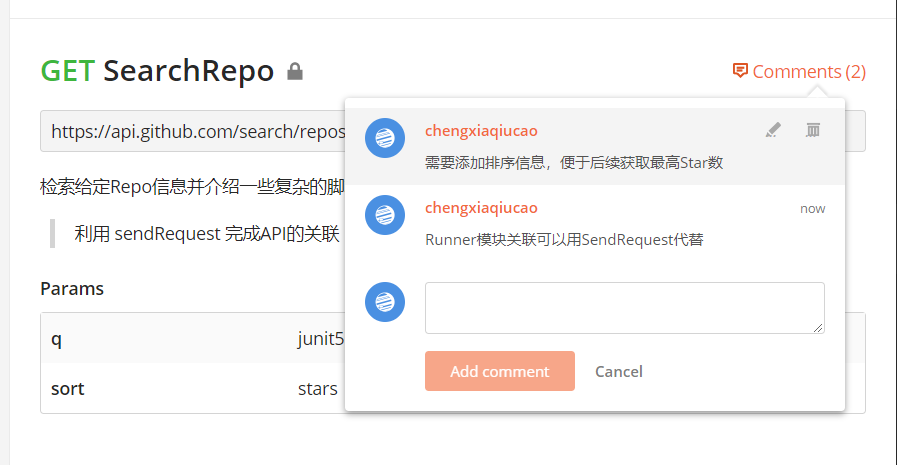
- Support for Comments
In private documentation such as team spaces, we can also use the comment feature to communicate with team members and confirm information by annotating interfaces.
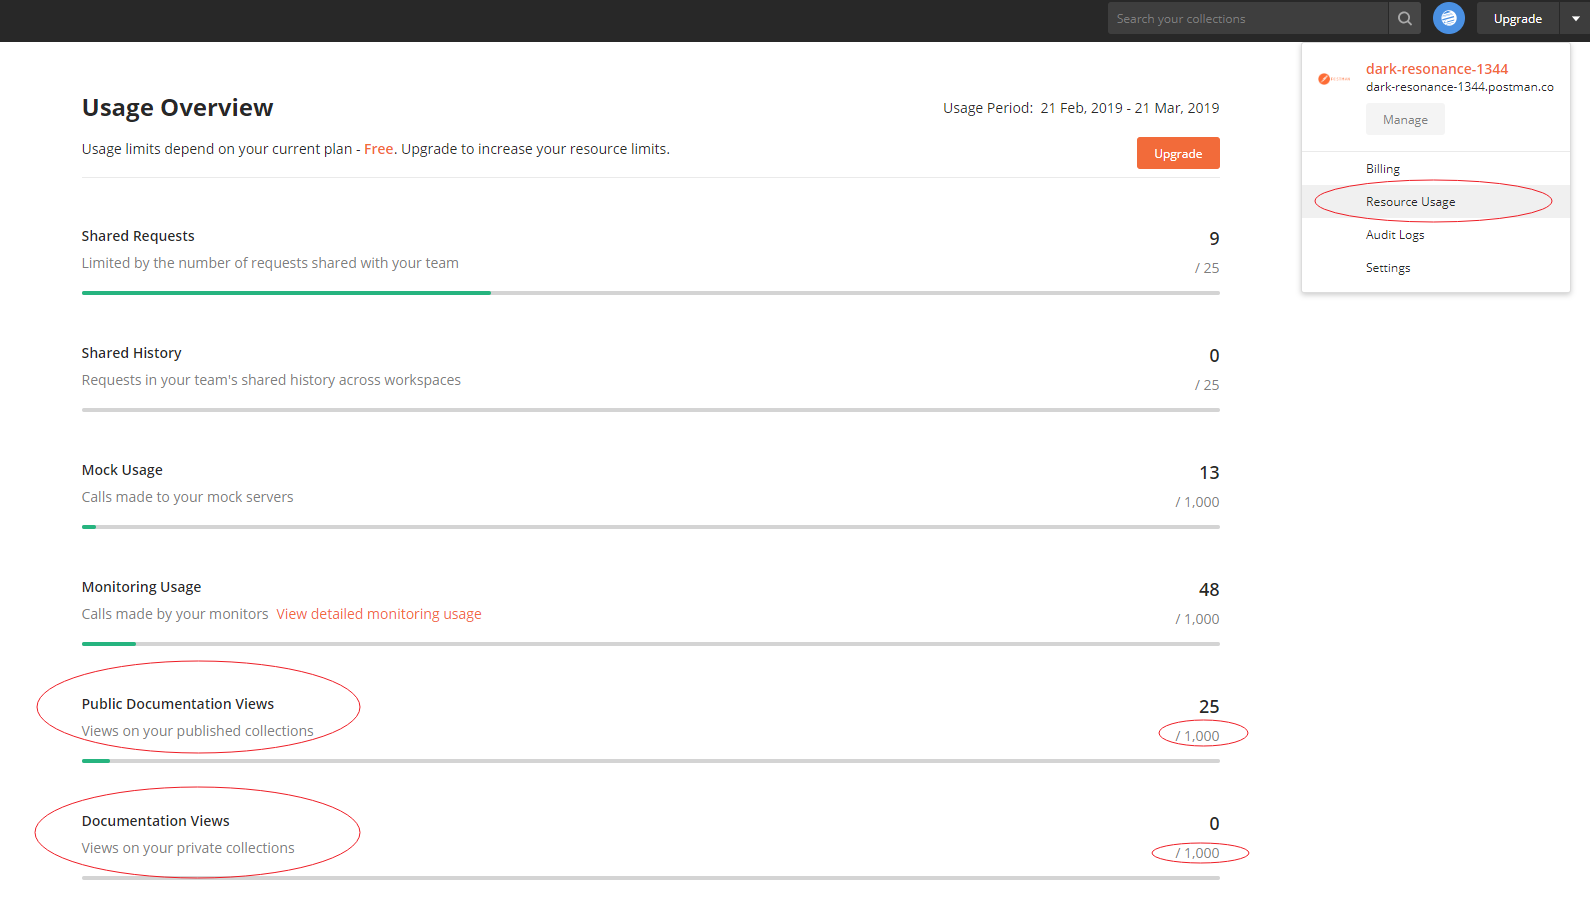
Postman Online Documentation Usage Limits
Postman Cloud limits the number of views for both private and public documentation. Free accounts have a monthly limit of 1,000 free views for each. This is barely sufficient for individual use and learning. For team collaboration, it’s definitely inadequate, so it’s recommended to choose a paid account or an open-source free alternative like Swagger.
Current usage can be viewed on the Resource Usage page of your personal account:
Introduction to Postman’s Mock Server
Another advanced feature of Postman Cloud is its support for Mock Servers.
In interface development and testing work, especially for software products developed in parallel by multiple teams such as frontend, backend, and app teams, a common situation is that progress often depends on other teams. For example, an app might depend on backend interfaces for debugging, or on interfaces provided by third-party teams. If the interfaces are not yet ready for joint debugging, to ensure development progress, mocking interfaces according to certain conventions becomes a necessary choice.
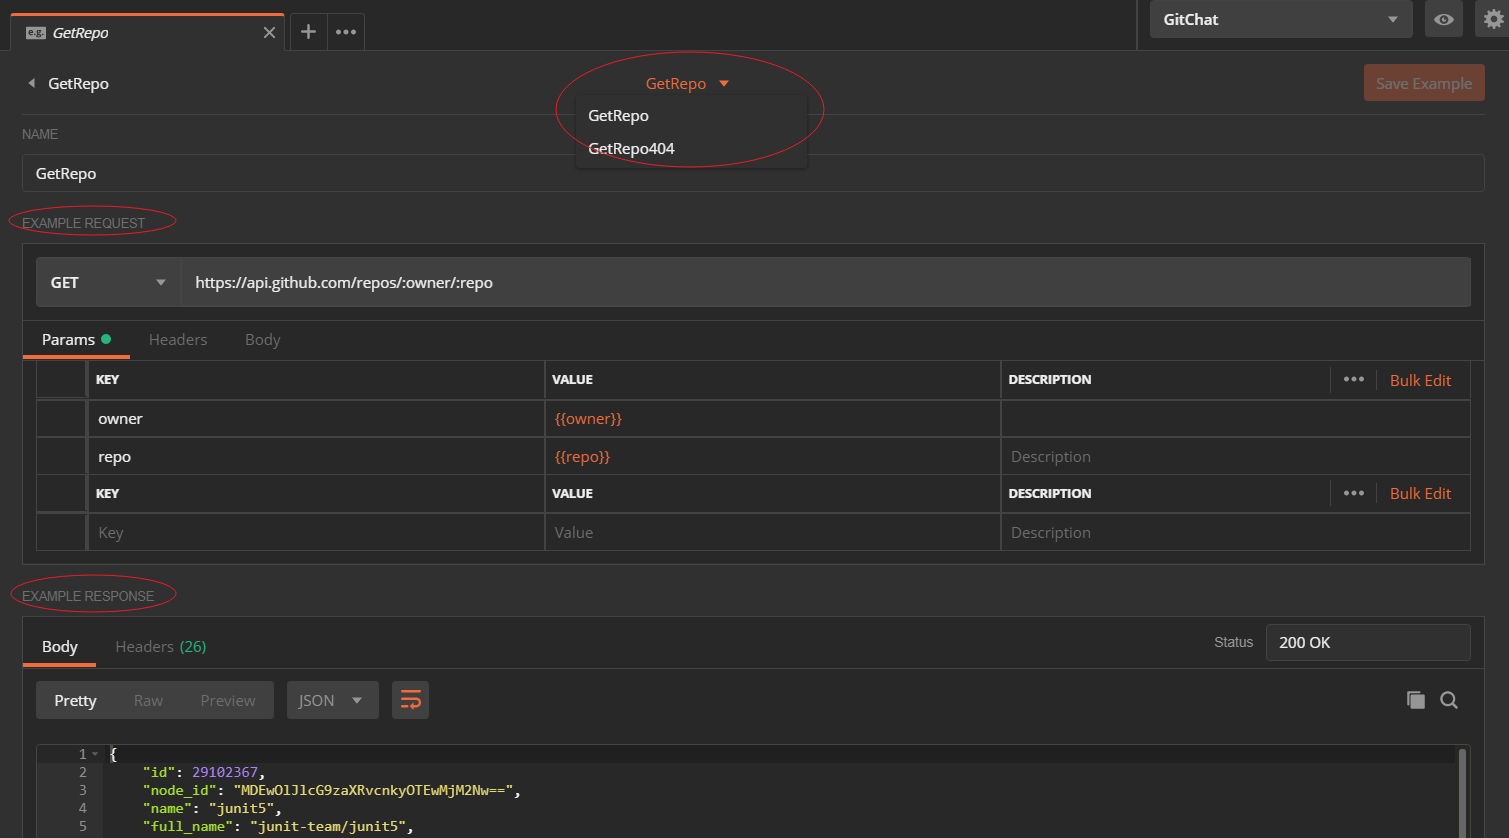
A Mock Server is a functional module that provides this service. In Postman, we can save responses as Examples, and then conveniently create Mock services based on these examples to simulate message responses independent of the original interface.
The image below shows a response Example saved in the Postman app. For the same interface request, we can save different response results as multiple different examples.
Creating a Mock Server
There are several ways to create a Mock Server in Postman:
- Through the New button in the Postman app
- In the launch window that automatically pops up when opening the Postman app
- In the Collection menu
- Through the Postman API
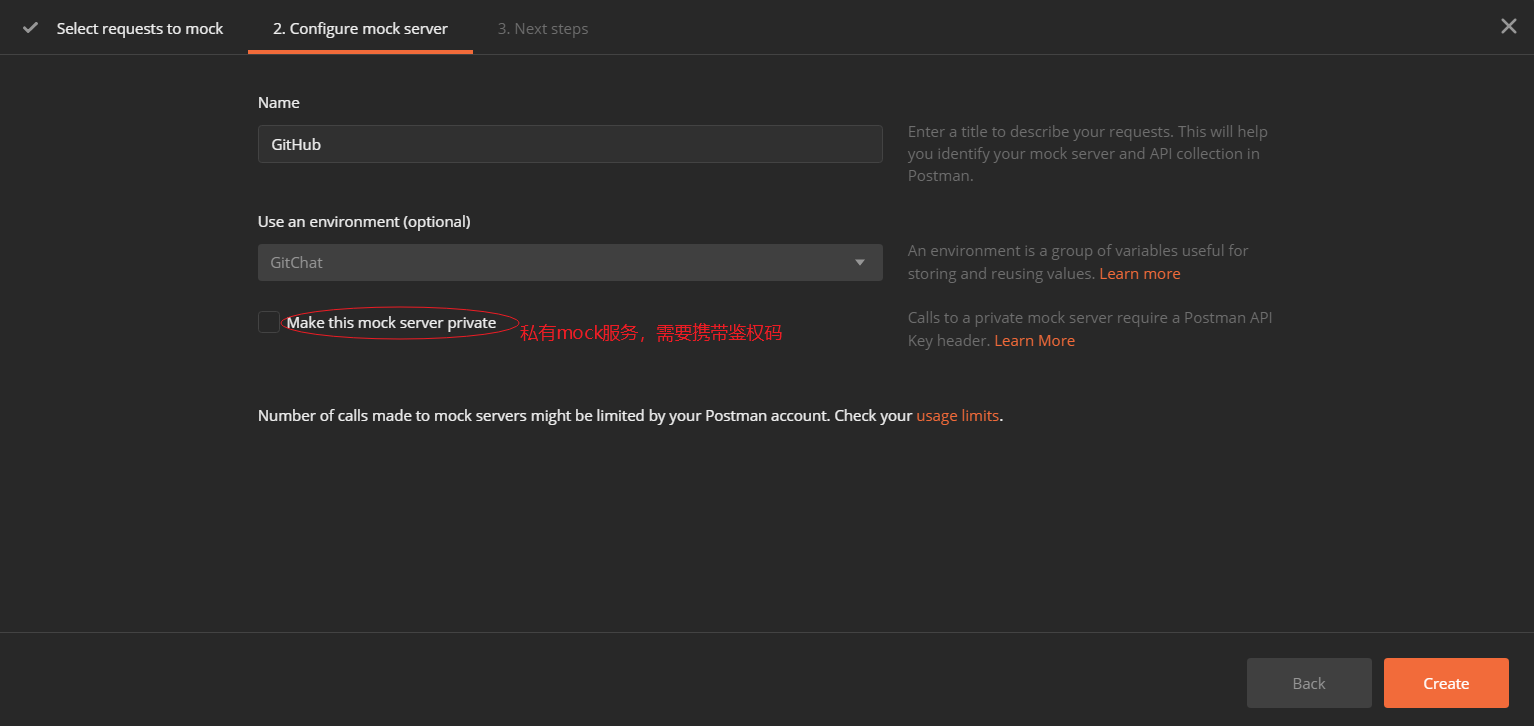
Here, we’ll use the Collection menu as an example. Select Mock Collection:
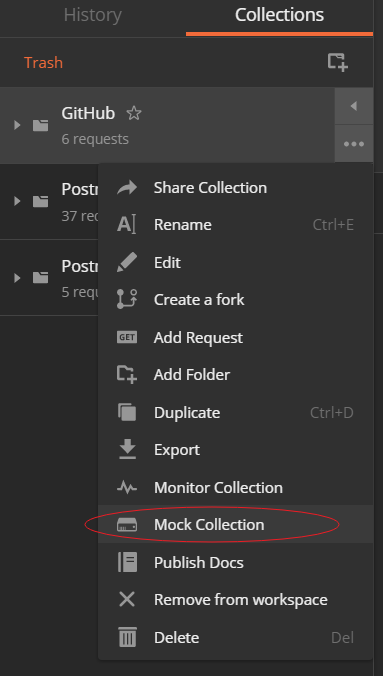
Set up the Mock Server based on the Collection information:
Upon successful creation, an online Mock Server access URL will be generated, in this example: https://b0fadee4-7560-4b14-a201-599985ce4f0f.mock.pstmn.io
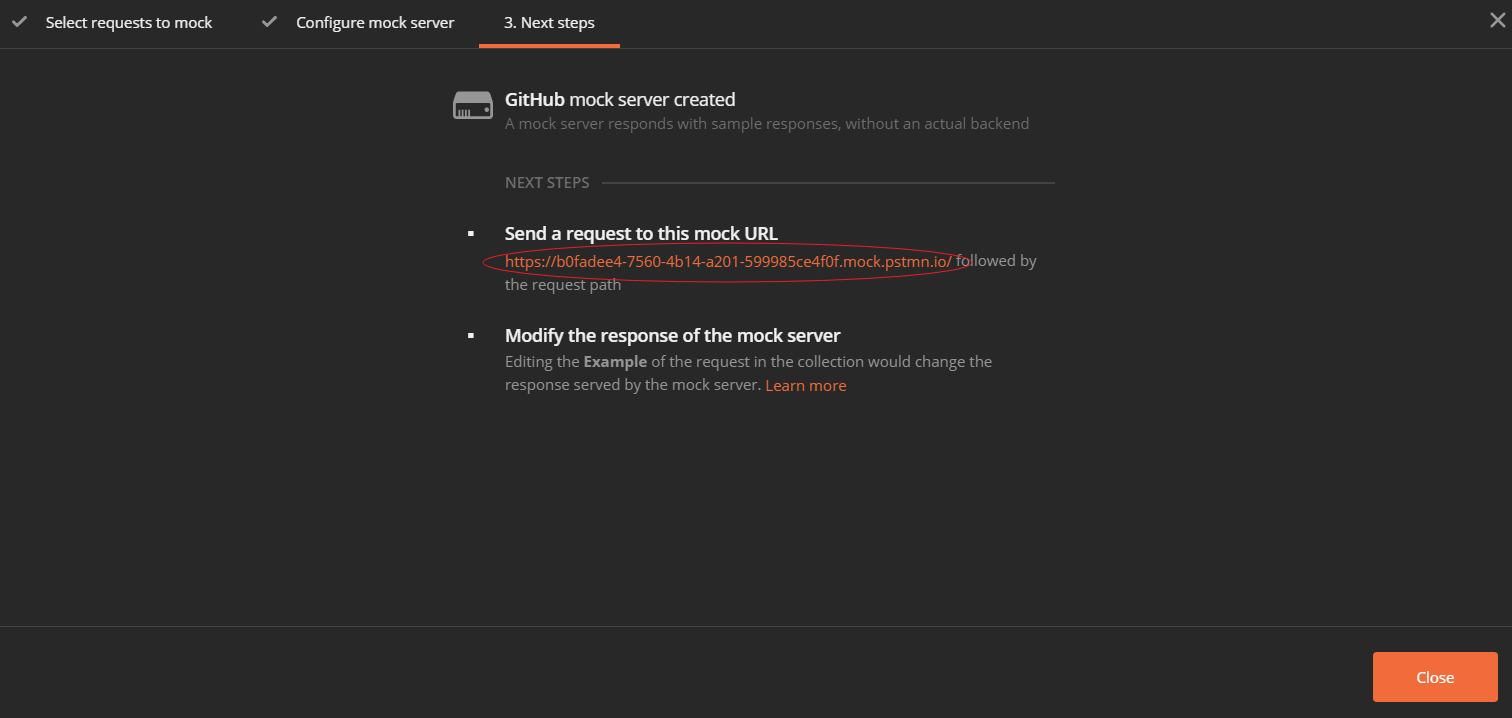
This completes the creation of the Mock service for the current Collection. Postman will default to creating an Environment with the same name as the current Collection, and in this environment, it will add a url variable with the value being the Mock service address just created.
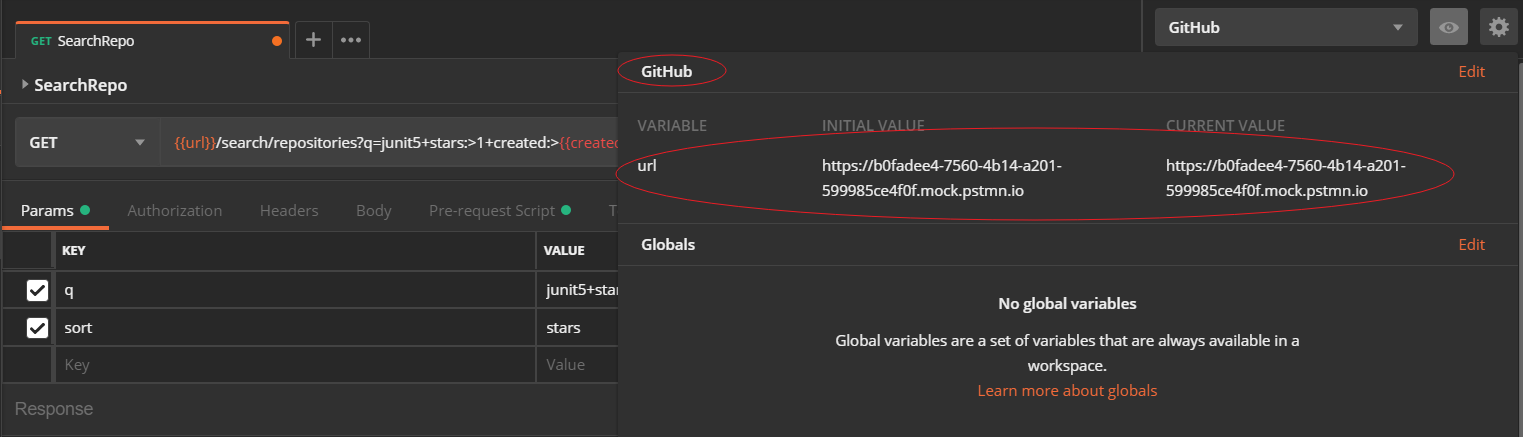
Using the Mock Server
After creating the Mock service, we can simulate interface responses through the previously generated Mock service address. The image shows accessing an interface saved in the Mock service, which returns the content of the previously saved response Example.

Mock Server Matching Algorithm
At this point, you might wonder how the Mock Server determines which content to respond with based on the request, especially when we have saved multiple Examples for the same request. Let’s introduce the response matching algorithm used by the Mock Server.
The image below shows the algorithm sequence used by the Mock Server for response matching:
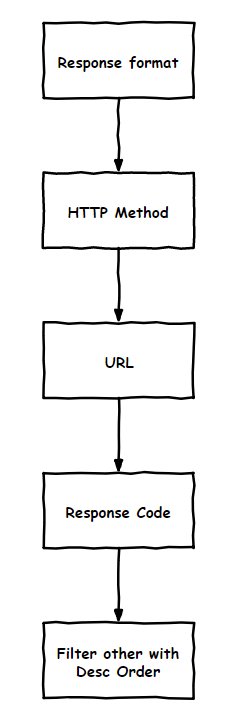
First, it filters responses based on the format of the content to be responded with, such as JSON or XML format (based on the request format definition).
It matches based on the HTTP method of the request, eliminating responses that don’t match the request’s HTTP method.
It matches based on the URL path of the request. It prioritizes strictly matching paths, then multi-level paths with
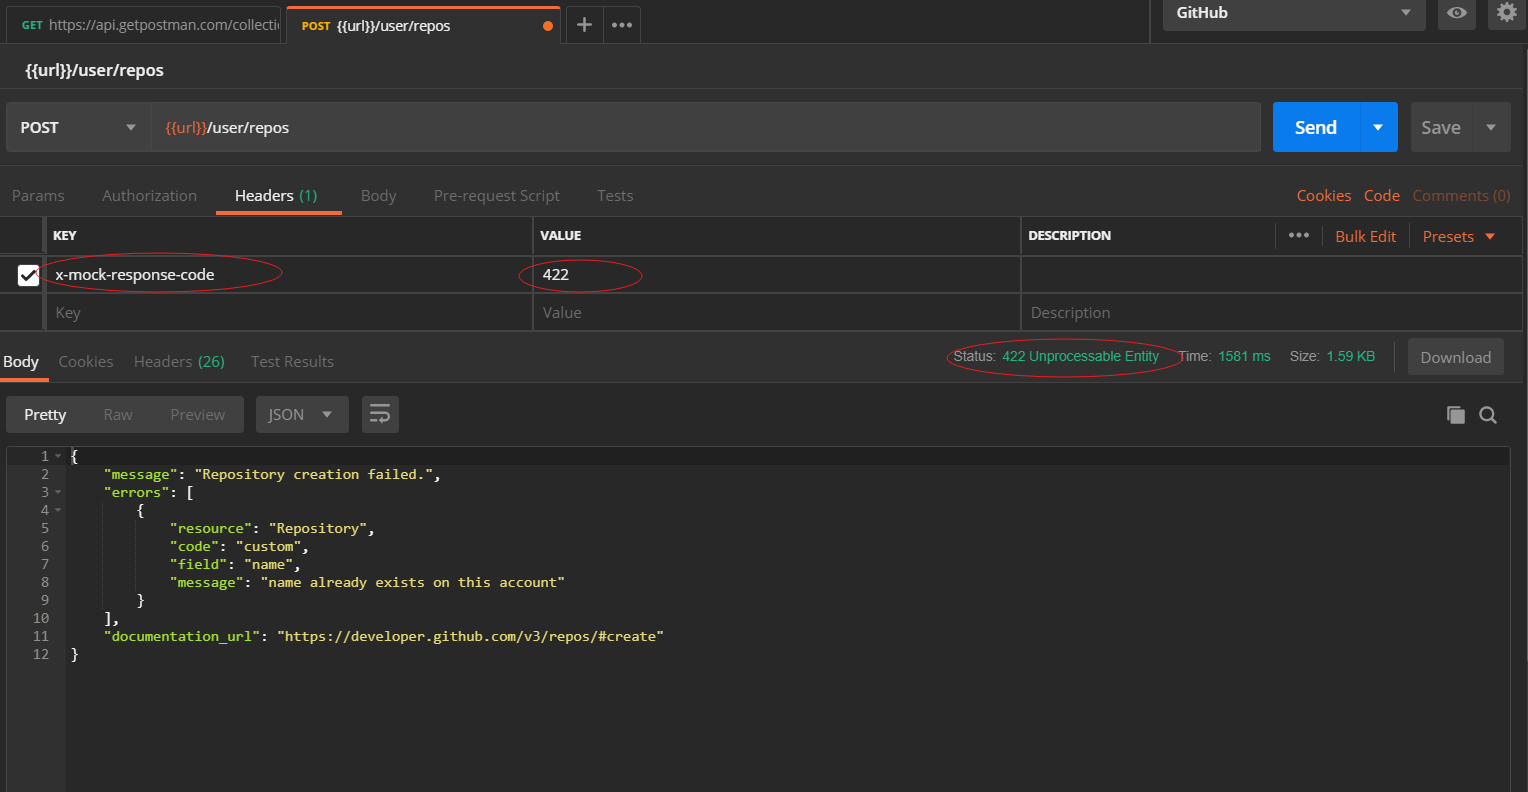
/, then paths ignoring case and ID information. If no match is found, it returns that no corresponding response was found.You can specify the response message by carrying a specified header value in the request message header. Postman supports carrying
x-mock-response-name,x-mock-response-id, andx-mock-response-codein the message header, which can specify the response name (saved example name), the ID of the response Example (unique ID, which can be queried through the API), and the response status code, respectively.Among the remaining responses, they are sorted in reverse order of saving, and the one with the highest threshold is selected for response.
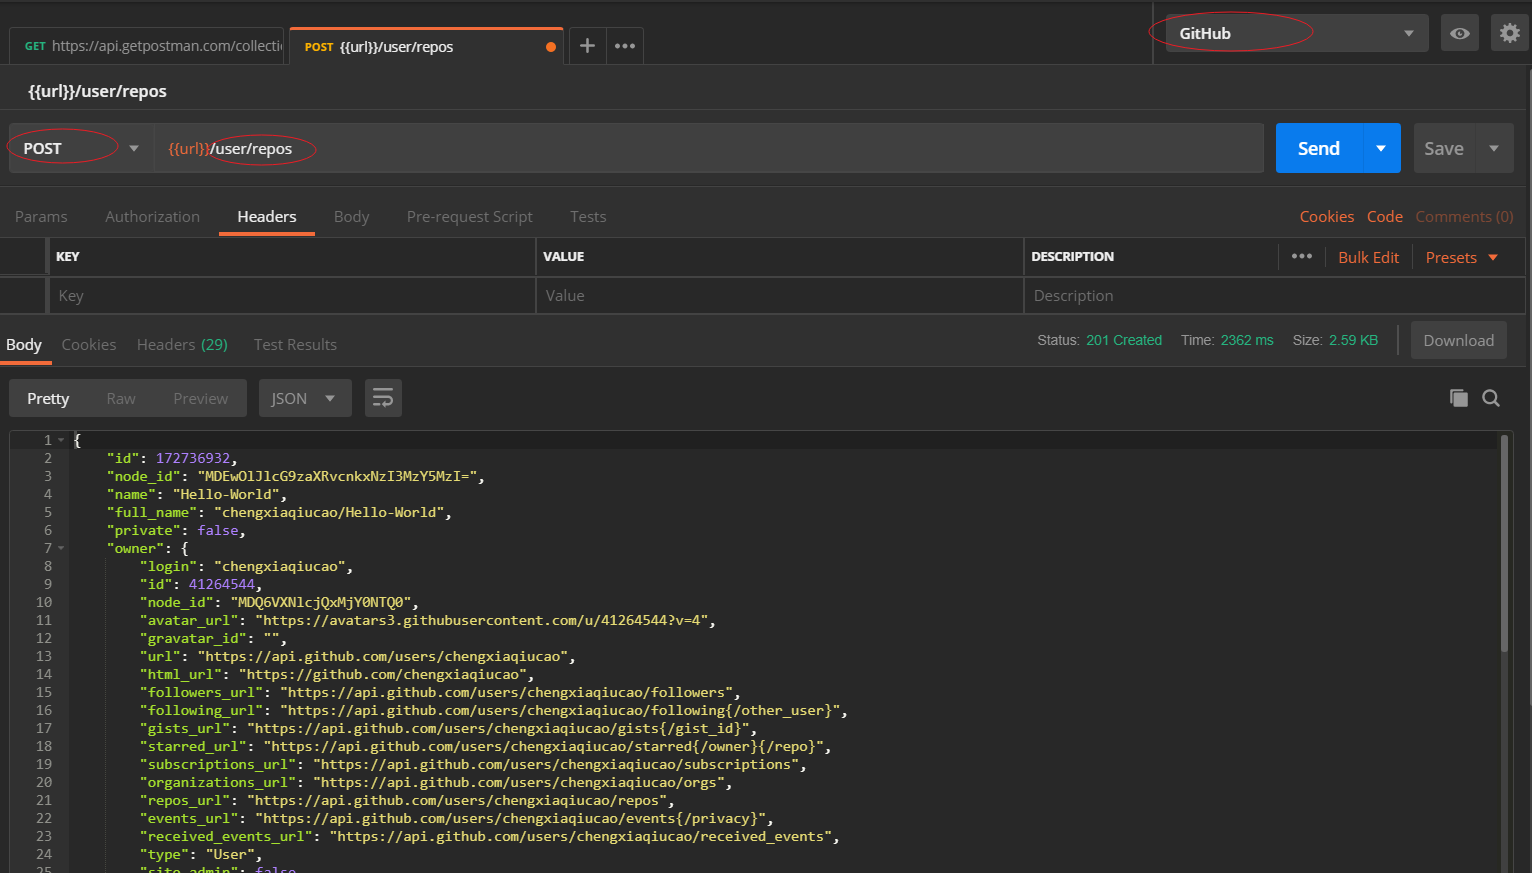
The image shows a Mock service for creating a Repo, with multiple response Examples. Here, it matches the request method and request path:
The image below shows a request that includes a specified Header, x-mock-response-code, specifying to return a response with a status code of 422.
As we can see, through Postman’s Mock Server service, we can simulate interface responses without relying on the original interface environment, to meet our business testing needs. Currently, free accounts have a monthly limit of 1,000 calls through the Mock Server.
Postman’s Monitoring Feature
Next, let’s introduce the monitoring service provided by Postman Cloud.
For internet applications, how do we ensure our business can correctly provide services? How do we prevent business interruptions due to service anomalies or network issues?
In the process of collaborating with external teams, if the other party’s interface changes, how can we be informed promptly to avoid a lot of wasted effort?
Due to these issues, the importance of monitoring interfaces is self-evident. Postman’s interface monitoring function is essentially a feature provided by the Cloud that schedules the execution of interface test tasks, records results, and sends notifications. You might say that this can also be achieved through CI integration tools like Jenkins.
Indeed, this effect can be achieved through CI scheduling, but Cloud monitoring can also provide the selection of different access regions and value-added capabilities such as trend visualization and analysis of monitoring results.
The image below shows selecting a new monitor from the Collection menu in the Postman app:
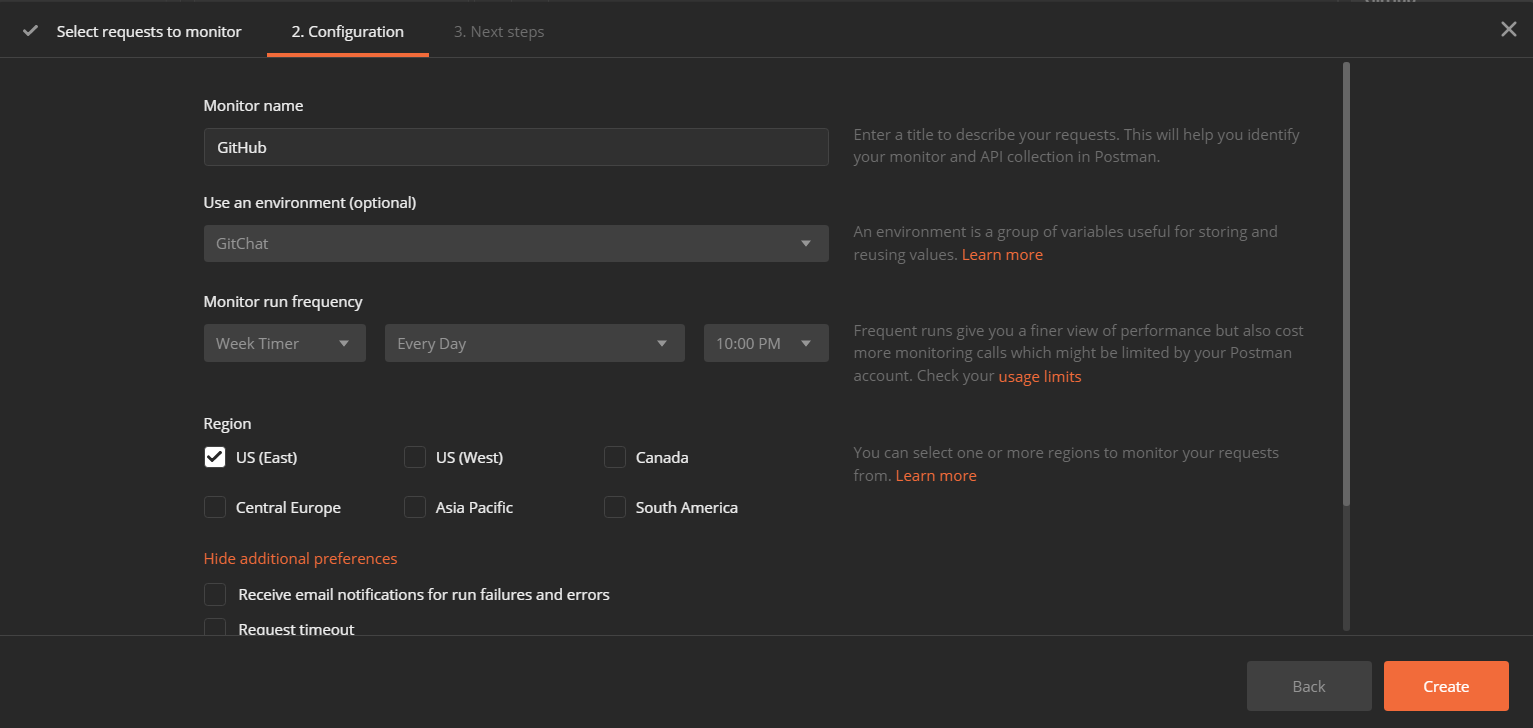
The image below shows creating a monitor in the Postman web workspace:

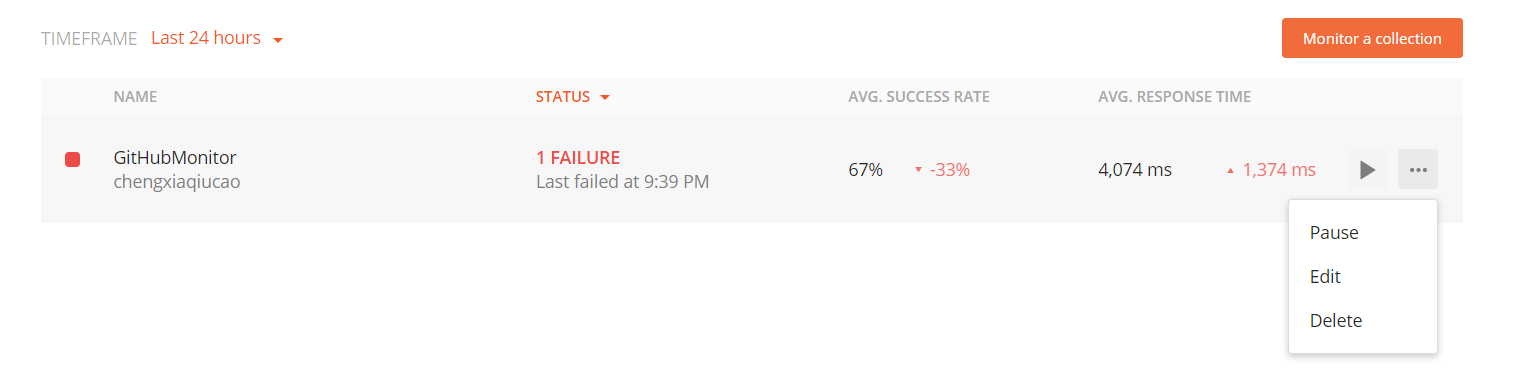
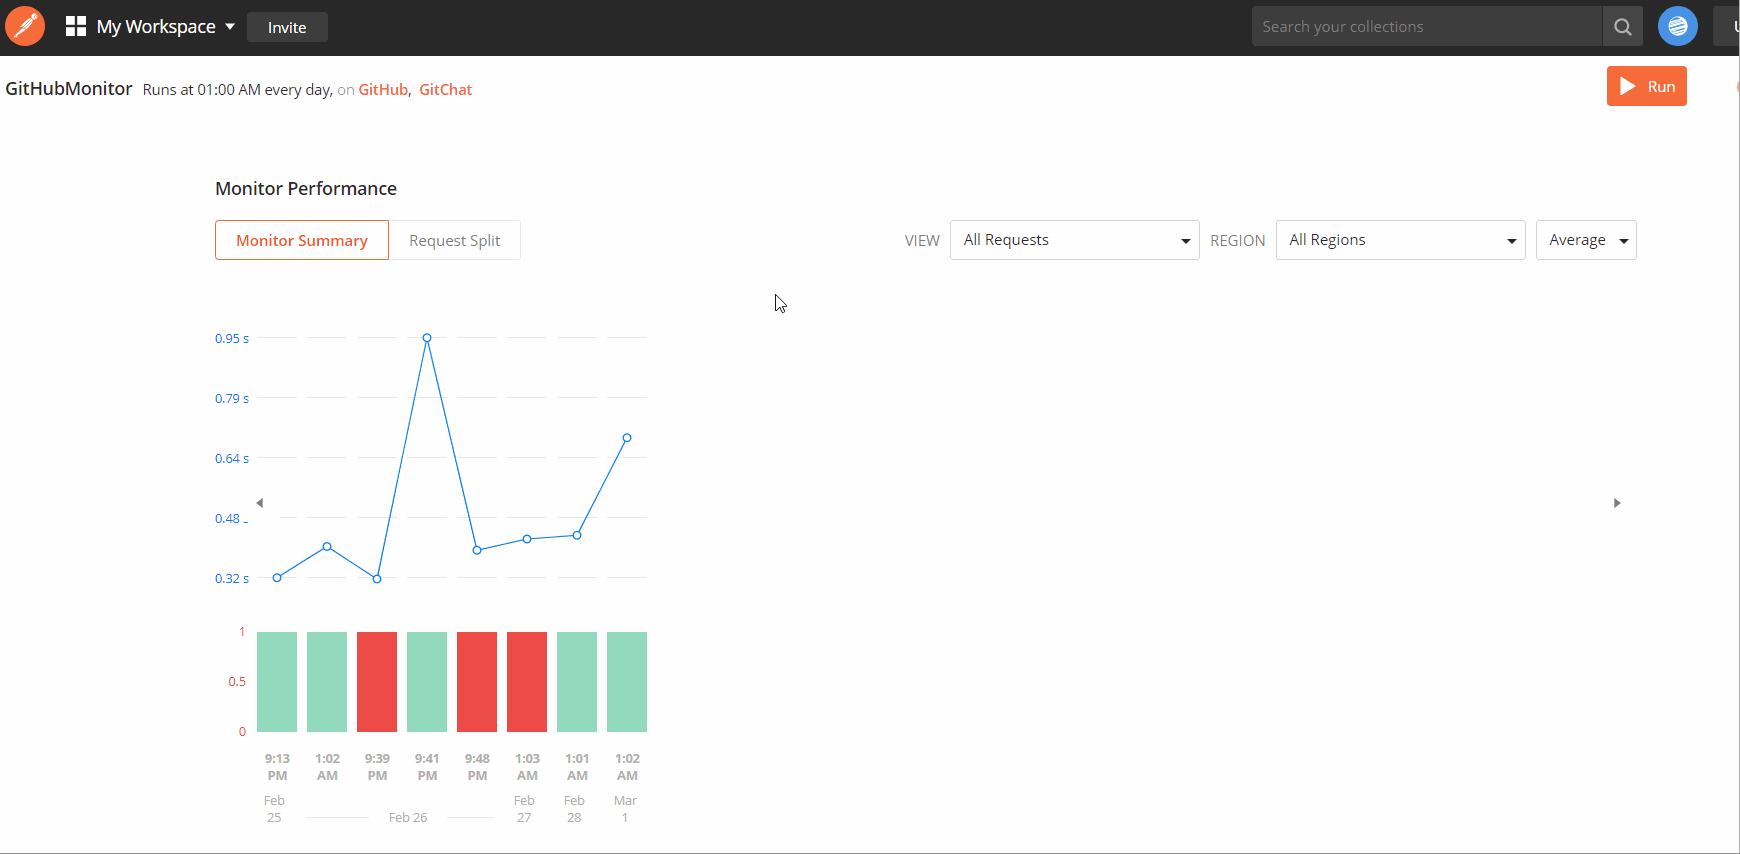
The images below show the created monitor and the monitoring results interface:
In addition to creating monitors through the App and the Cloud web interface, we can also create monitors through the Postman API.
Additionally, there are several limitations to Postman’s monitoring function that you should be aware of:
Since monitoring is executed in the cloud, the monitored interface needs to be accessible via the internet. For interfaces developed on an intranet, a public access interface needs to be exposed.
Postman currently doesn’t have a file storage function, so it doesn’t support attaching files in interface requests.
Similarly, it doesn’t support using data files to provide data variables.
The interface execution record doesn’t record the request and response message bodies.
Currently, free accounts have a monitor interface execution limit of 1,000 times per month.
Postman’s Open API
Besides creating and managing Collections, Environments, Mock Servers, Monitors, etc. through the Postman App and the cloud web interface, Postman Cloud also provides its own API interfaces, making it convenient for users to call from their own tools or scripts, and more easily schedule and manage the related services provided by Postman.
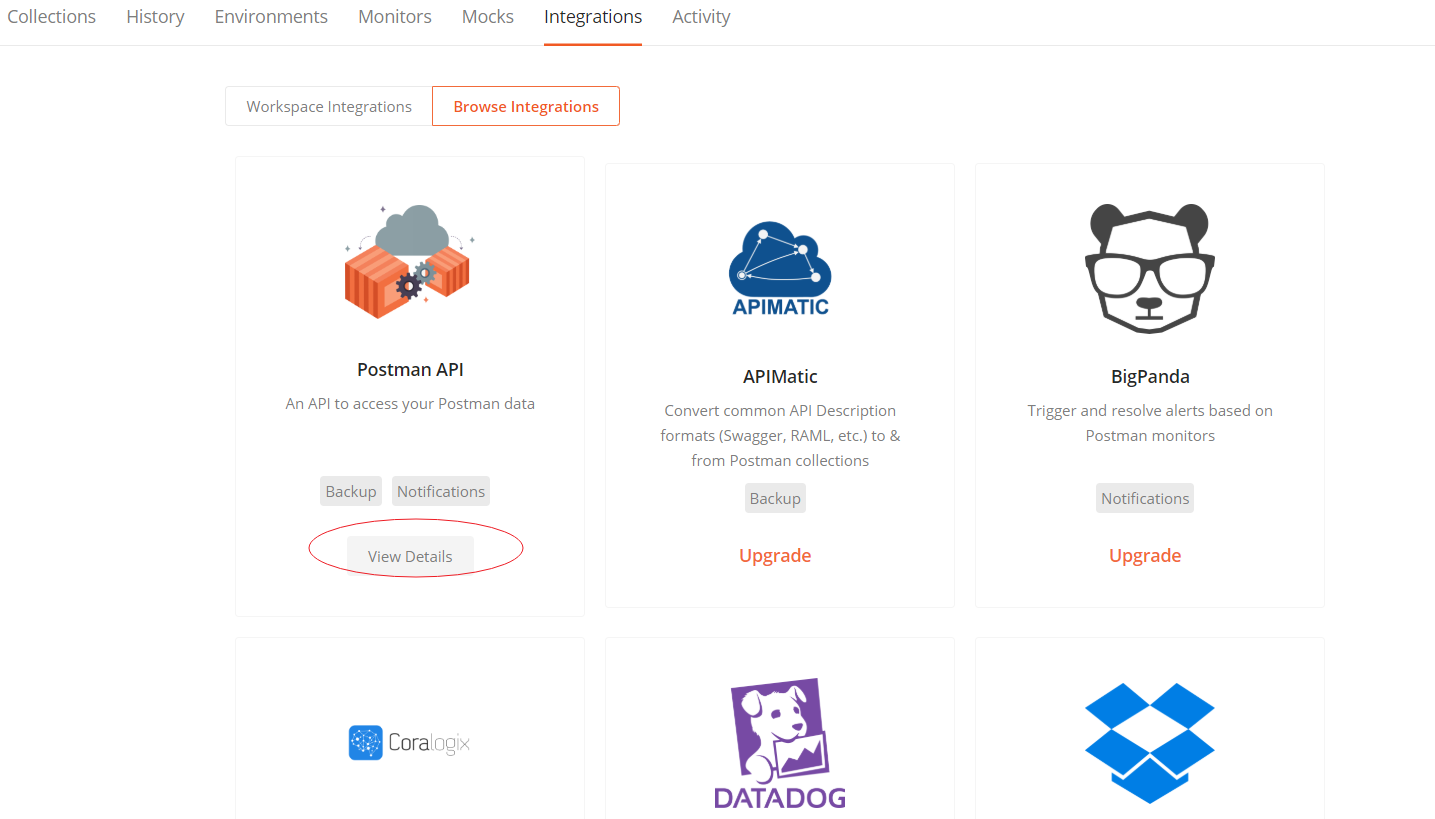
Postman’s API is provided through cloud-based Integration. (For professional and higher accounts, other integrated third-party tools are also available.)
Obtaining Authentication Code
To use the Postman API, you first need to generate an authentication code. Enter from the interface shown above, select Get API Key:
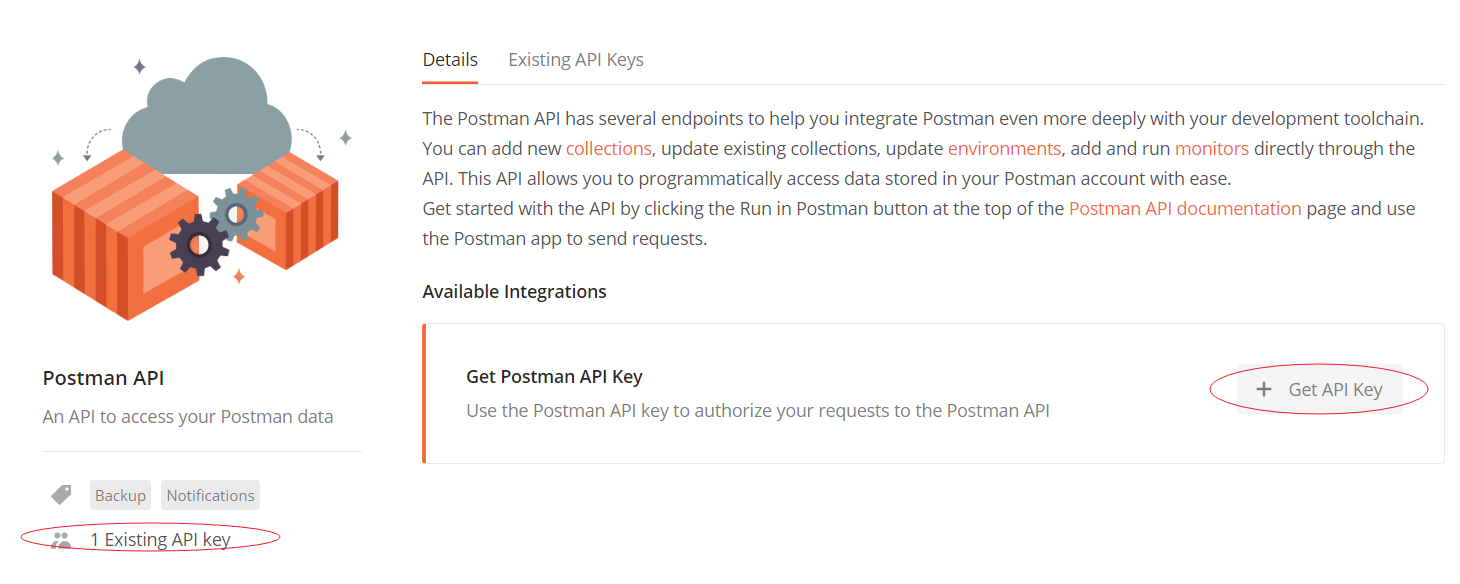
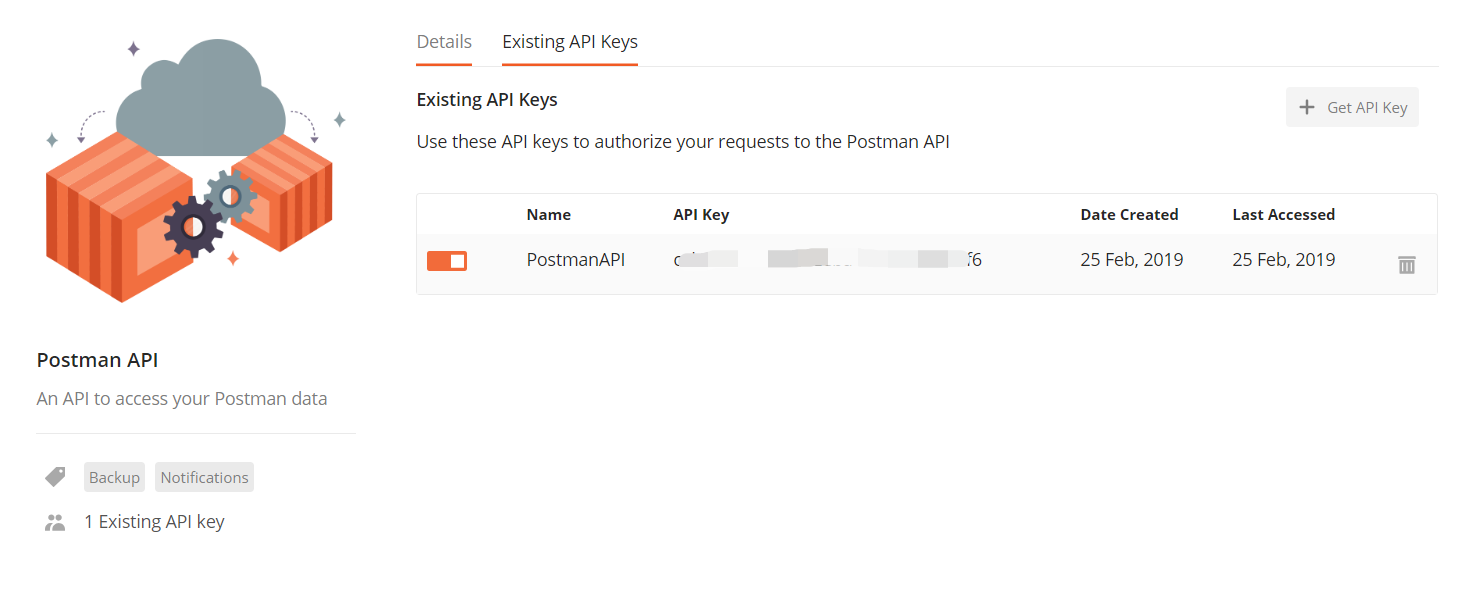
After generation, you can view the current Key value in Existing API Keys:
There are two ways to use the authentication code for the Postman API:
By adding an
X-Api-Keyheader in the request message to carry this key value for authentication.By carrying the query parameter
apikeyin the request URL, such as:
| |
If you don’t carry the authentication code, the interface will return the following error:
| |
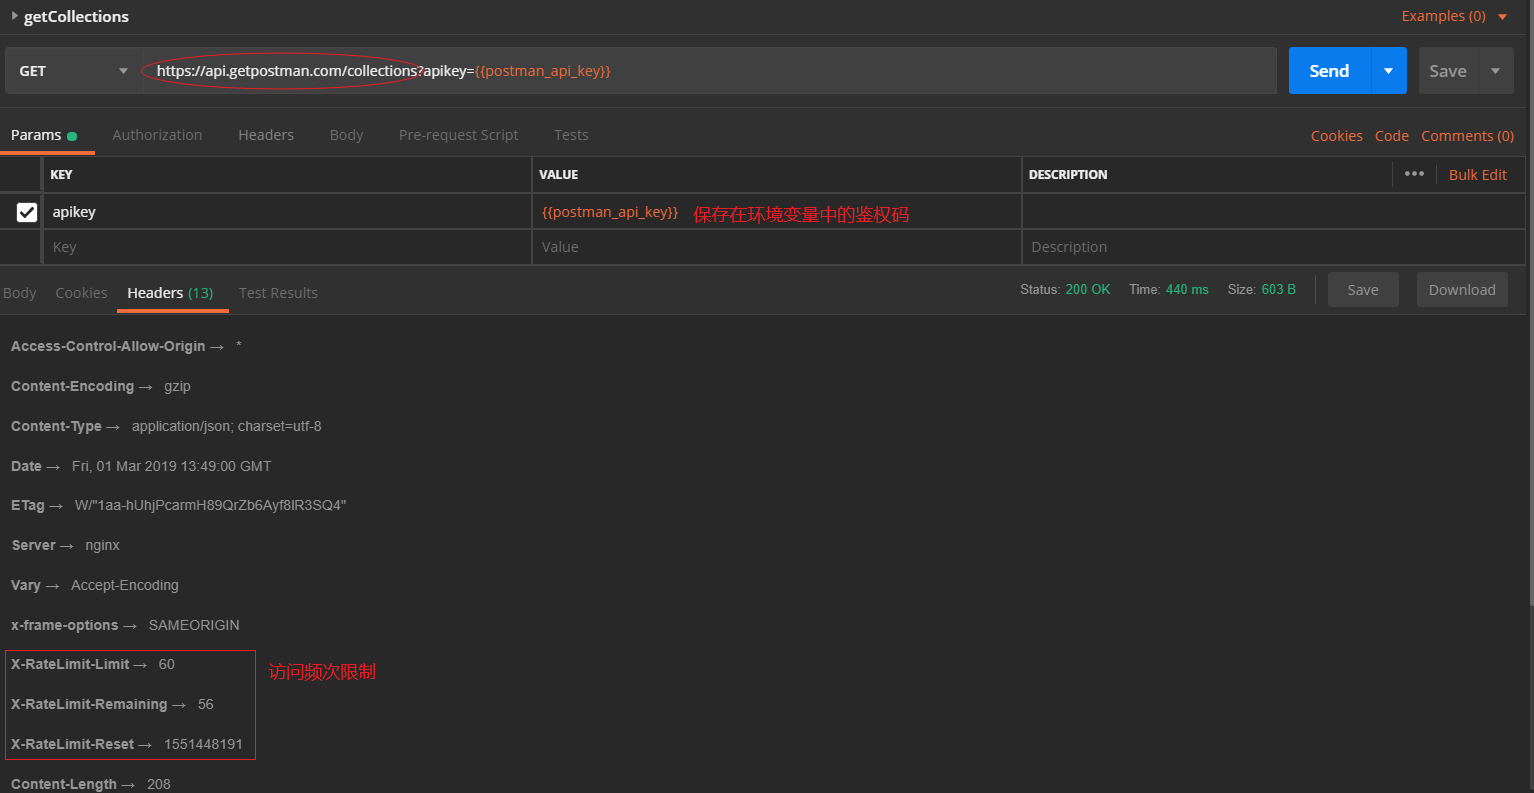
Access Frequency Limits
Similar to most RESTful API services, to prevent DDOS attacks, Postman API also limits the frequency of interface access to no more than 60 times per minute. In the response message, you can learn about this limit, remaining count, and reset time through custom headers such as X-RateLimit-Limit, X-RateLimit-Remaining, and X-RateLimit-Reset. As shown in the interface below for getting all Collections:
Usage Examples
Let’s look at several examples of Postman API calls:
- Getting Collection Information
In the previous rate limit image, we accessed the interface to get all Collections under the current account, with a response like:
| |
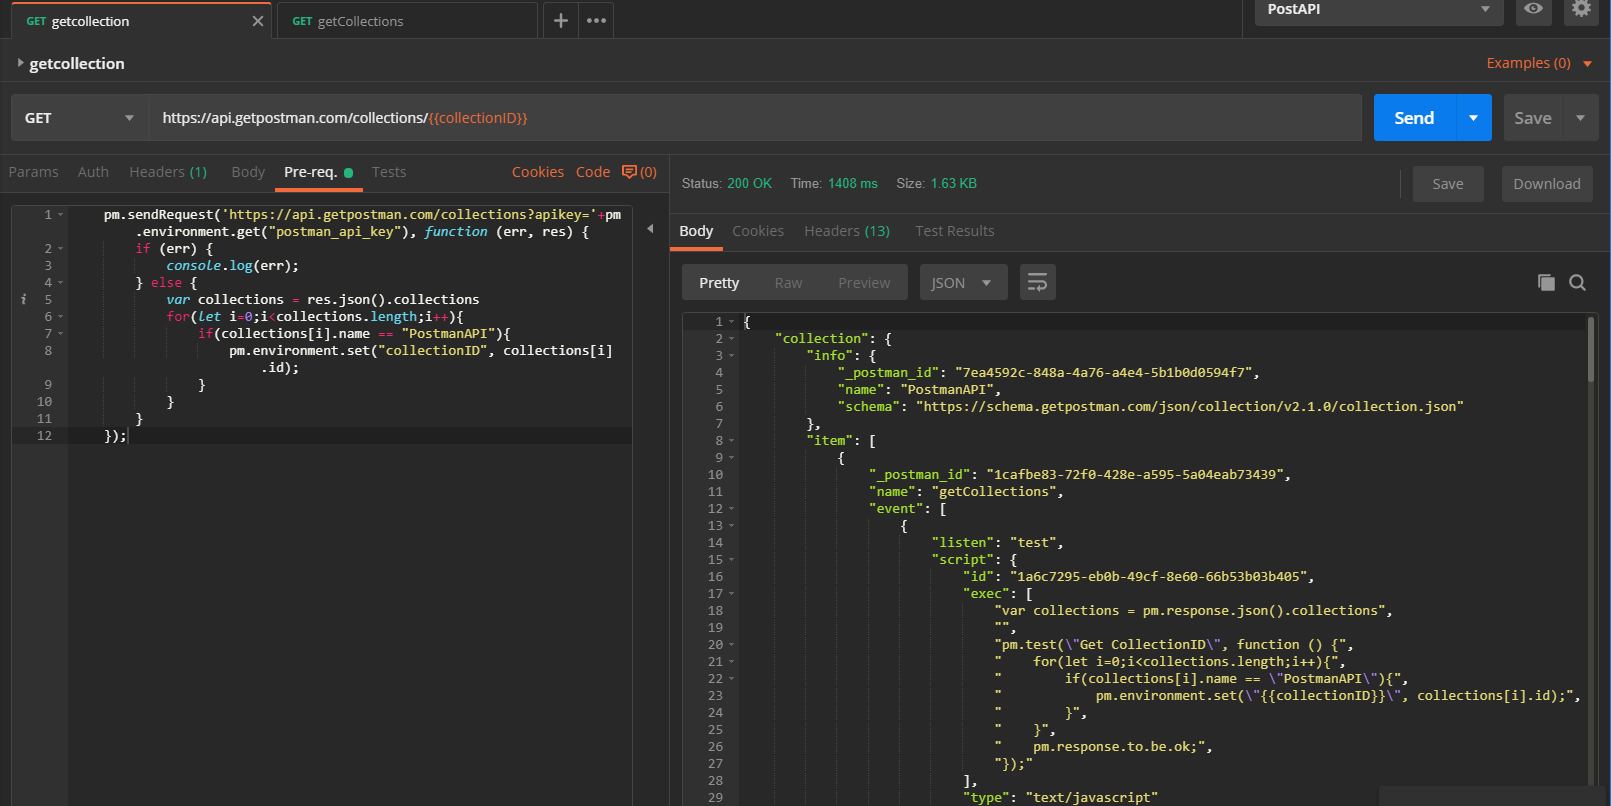
By providing the ID of the relevant interface, we can get detailed information about a single Collection using the interface:
| |
For example, here we can use Postman’s Pre-Script to first get the ID of a Collection with a specific name like PostmanAPI, then assign the ID to the environment variable {{collectionID}}. The code is as follows:
| |
As shown:
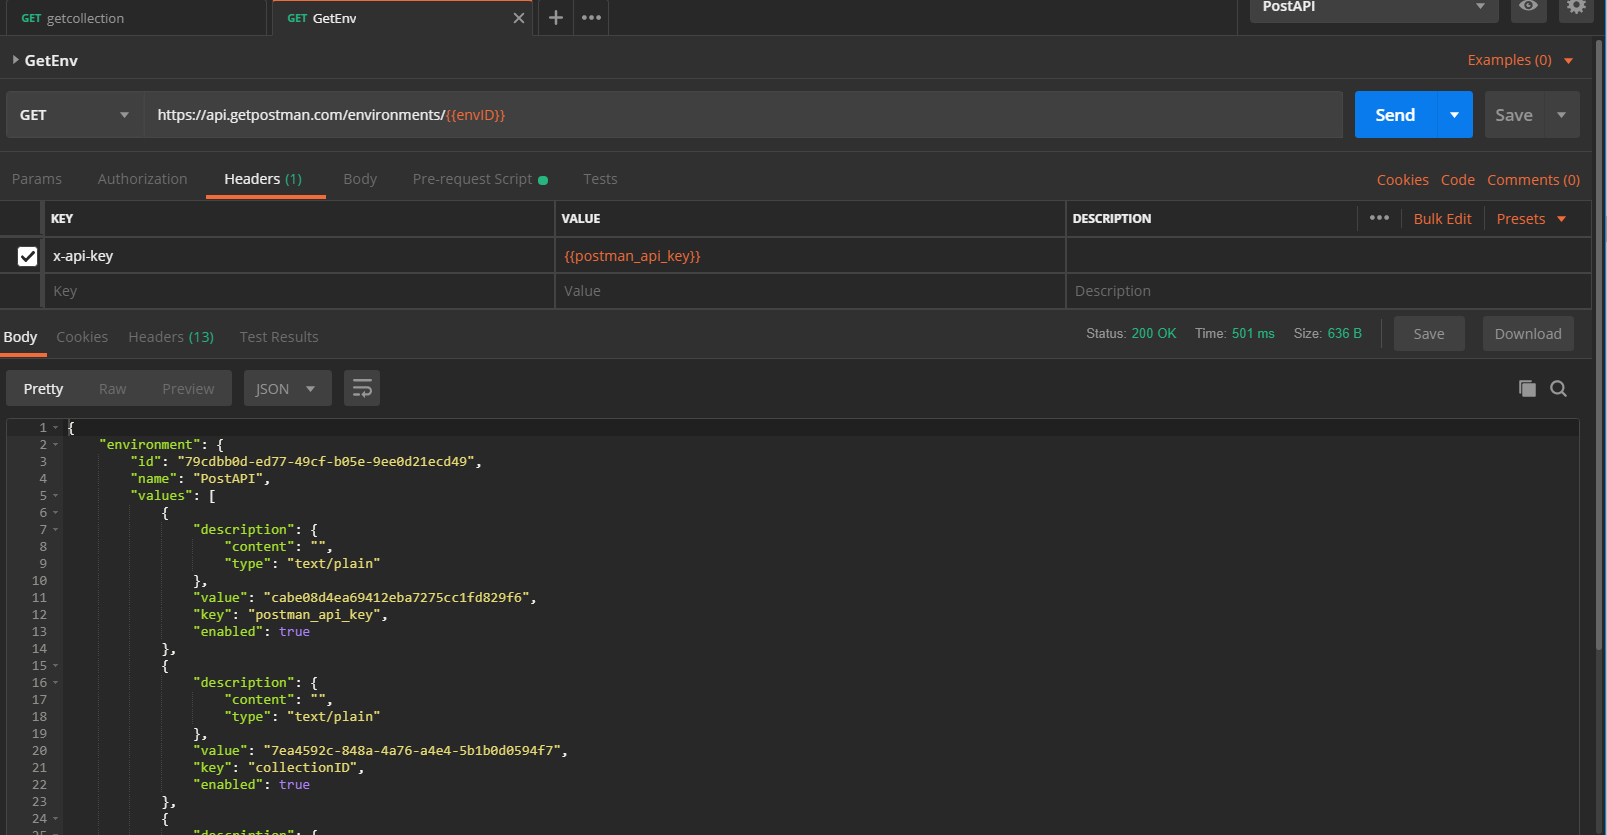
- Getting Environment Information
Similarly, we can get information about a single environment:
Pre-Script code as follows:
| |
Screenshot of the call:
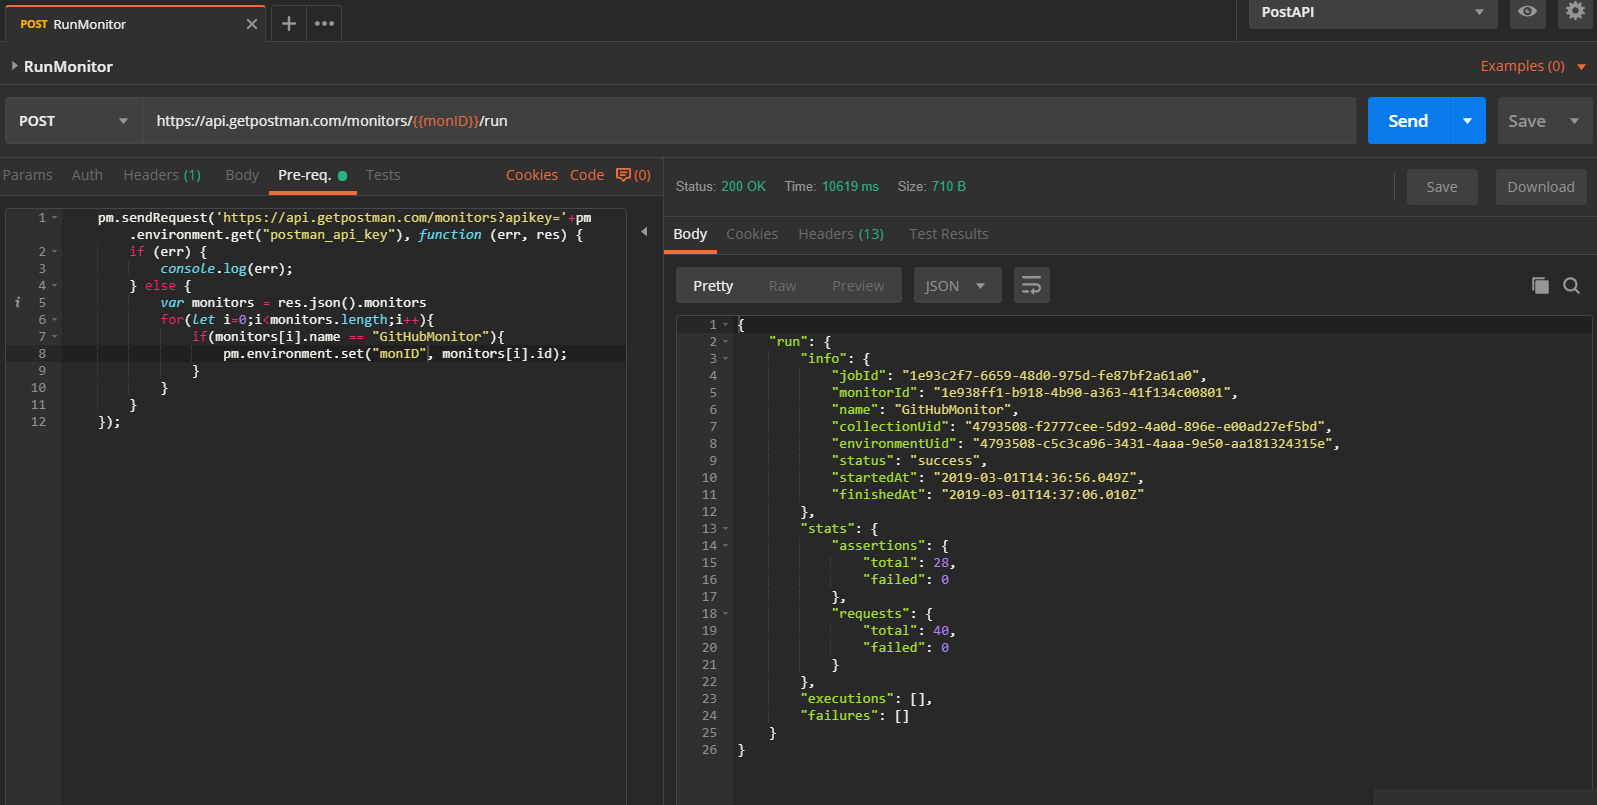
- Running a Specified Monitor
We can also immediately execute a specified Monitor through the interface. The interface returns execution results as shown:
Besides the examples above, detailed interface documentation for the Postman API can be found in the official API documentation. Similarly, the current interface call limit for free accounts is also 1,000 times.
Conclusion
Above is the introduction to the advanced features provided by Postman Cloud. As we can see, through Postman Cloud, we can leverage cloud service resources to accomplish some value-added functions that are not easily implemented by the local app, making it more convenient for team sharing and collaboration, enhancing convenience while accelerating our interface development or testing progress. Postman’s free version fully supports these value-added services but has certain usage limits. These value-added services can actually also be implemented through some open-source tools, which we can share with you in the future.
This concludes the systematic introduction to the Postman tool series. Welcome to continue discussing testing technology and sharing industry dynamics in the readers’ circle or by joining the WeChat group to grow together!