Introduction
In the previous two articles “Postman: Basic Guide” and “Postman: Advanced Guide”, we introduced how Postman, as a professional API testing tool, is primarily used in API testing and its powerful variable and scripting capabilities, which greatly facilitate manual testing work for testers. In fact, Postman also provides excellent support for automated testing. In this article, we’ll explore how to use Postman for API automation testing.
Automation Testing Overview
Before continuing with this article, let’s first review some basic concepts related to automation testing. According to Baidu Encyclopedia’s definition:
Automated testing is a process of converting manually driven testing behaviors into machine-executed operations.
Manually driven testing behaviors, in a broad sense, can include the entire process from test requirement analysis to test design, test execution, and test summary, while in a narrow sense, it generally refers to embodying test design through test code and automatically completing test execution and outputting results through code execution.
When we talk about automated testing now, it’s more often at the narrow level, using automated testing to improve test execution efficiency and quickly obtain the status of the tested product through rapid test case execution results, more as a quality indicator.
In “Postman: Basic Guide”, we introduced the classic automation testing pyramid:
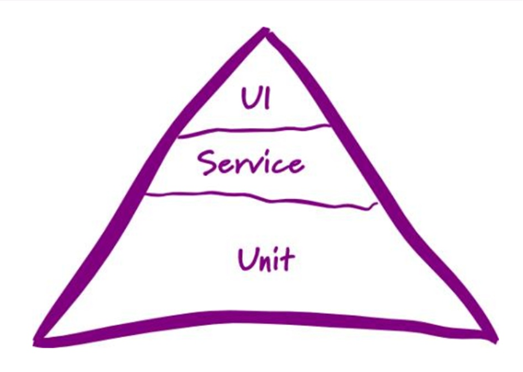
Here, software testing is layered according to different test types:
- The bottom layer is unit testing aimed at the code level.
- The middle layer is service testing. Modern software applications basically manifest their services in the form of API interfaces, so service testing can also be understood as API testing.
- The top layer is user interface testing.
This model reflects in automated testing that the lower the layer, the greater the proportion of automated testing should be, which leads to a better return on investment. The middle layer of Service testing is neither as maintenance-intensive as the UI layer, making it difficult to keep up with rapid iteration requirements, nor is it as focused on quality verification of business logic as unit testing. Therefore, API testing is now generally considered the priority choice for automated testing implementation.
With the help of some automated testing tools or automated testing frameworks, we can more conveniently implement automated testing in terms of test case organization, execution strategy, test data management, result reporting, and other aspects. Let’s look at the support Postman provides for automated testing.
Postman’s Batch Execution Tool: Runner
Runner is a module in Postman used for batch execution of API test cases. We can use the Runner module to complete automated test execution of written API test cases.
Runner Feature Introduction
In the upper left corner of the Postman main interface, click the Runner button to open the Runner module interface. As shown below:
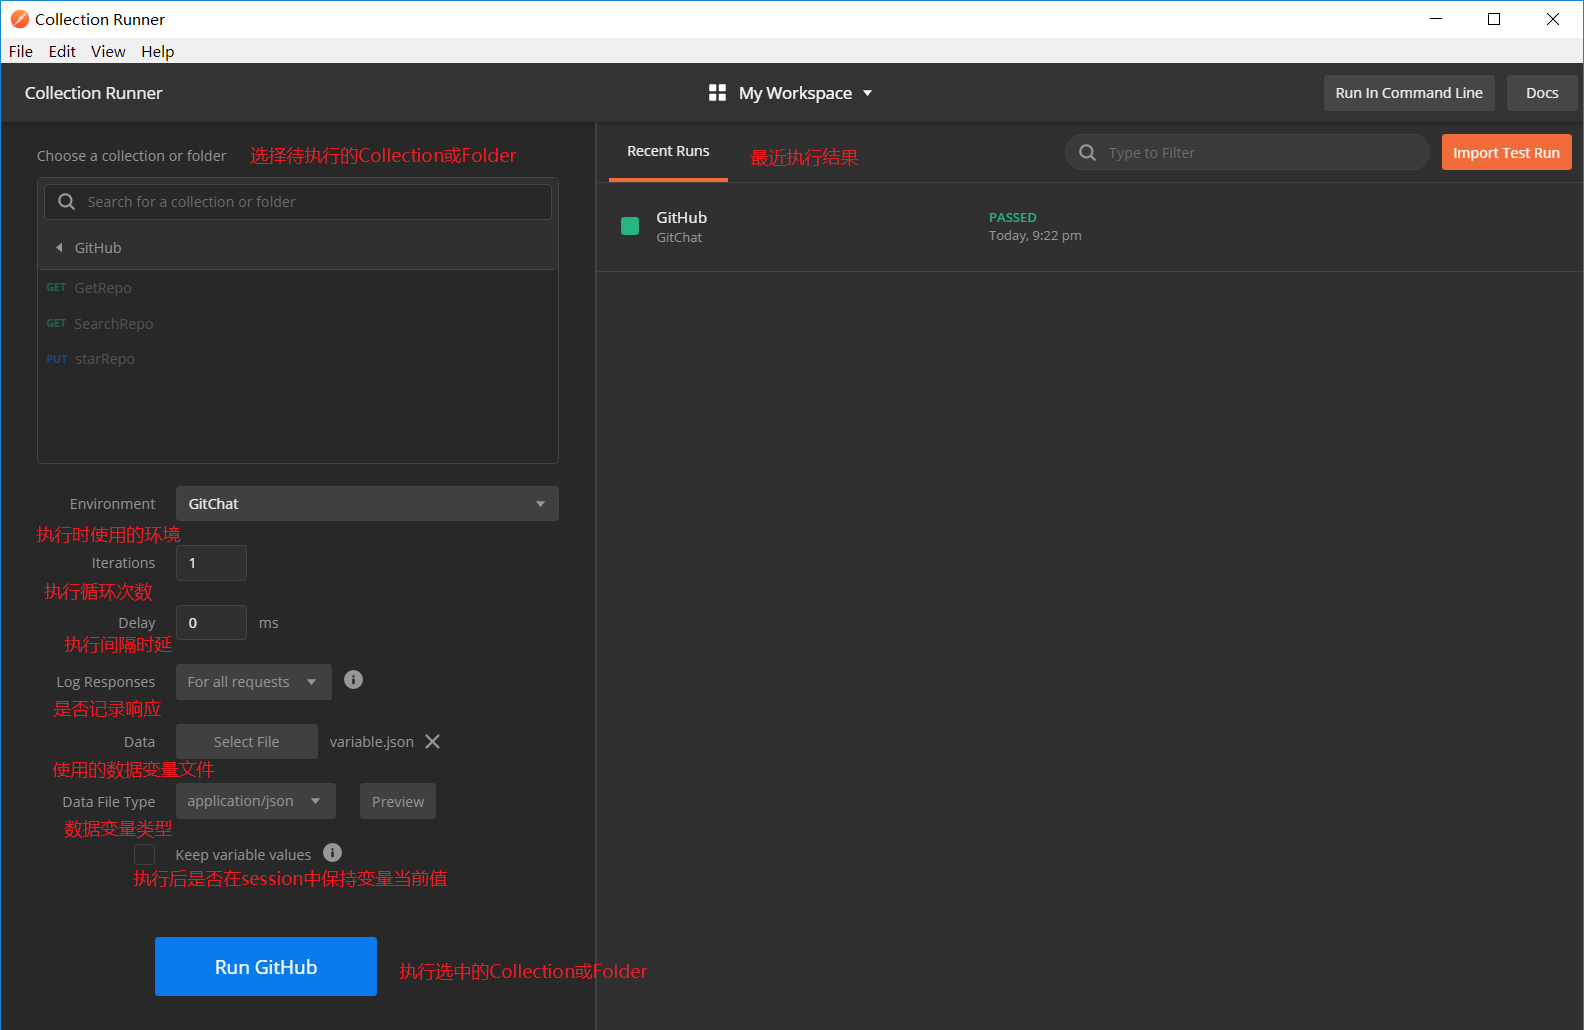
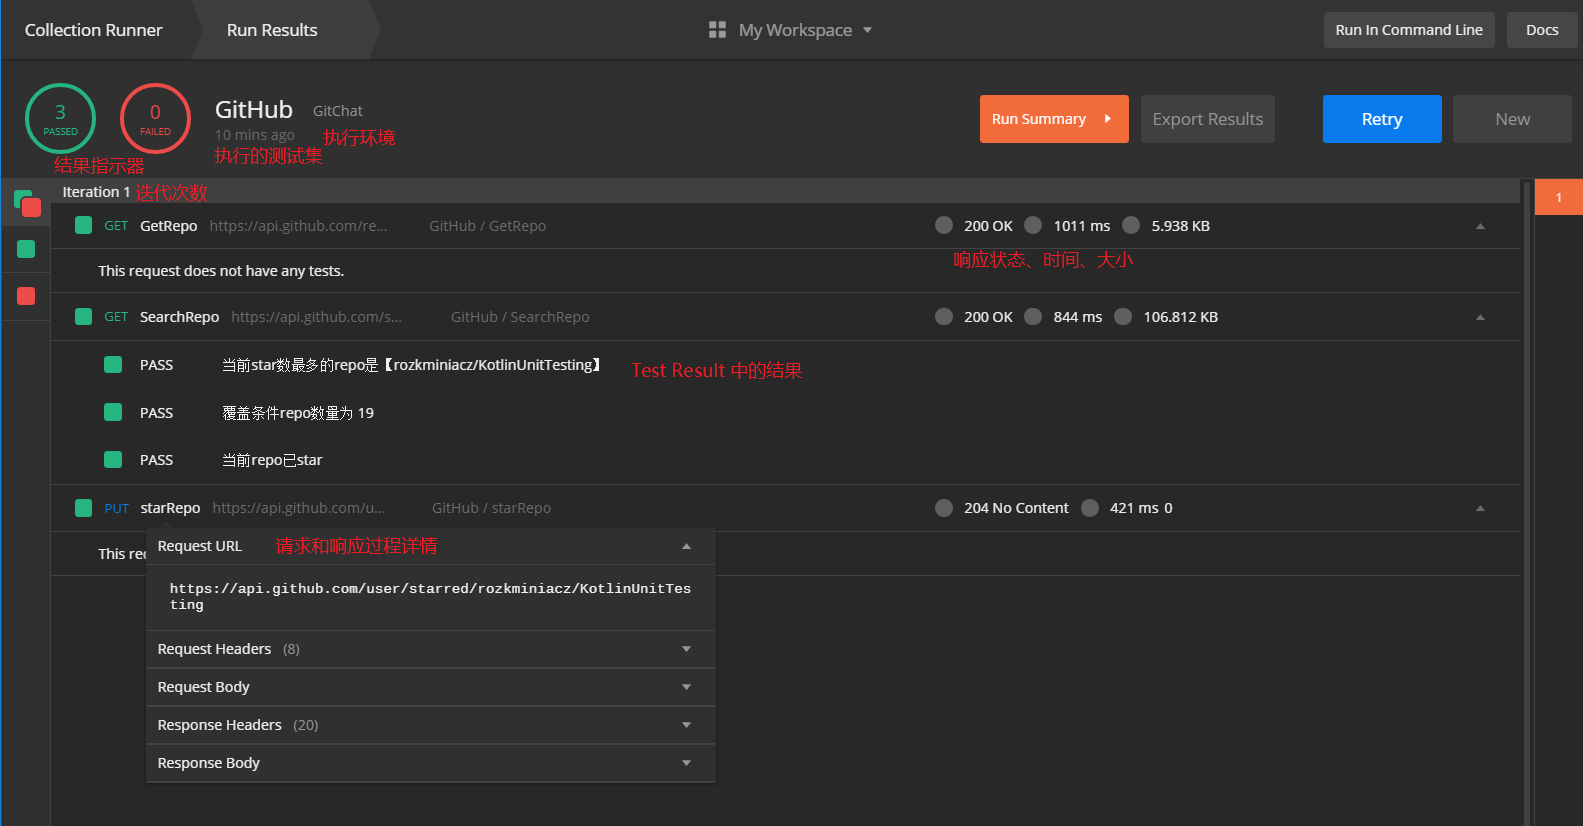
The functions of the related settings are marked in the image above. After selecting the Collection or Folder to be executed, click the run button to start the running page shown below, which displays the execution results. The meanings of the related interface elements are marked in the image:
API Test Data Driven
Postman supports test data loading and data-driven execution during Runner operation by introducing data variables. In the previous article “Postman: Advanced Guide”, we briefly introduced how to use data variables. Here, let’s review with a GitHub API example:
The data file provides a set of Repositories information (test data), and we run a series of APIs related to this set of data: get repo, get repo contributors, get repo tags, get repo topics, and perform relevant validations for each
Postman supports two types of external data formats: JSON format or TXT/CSV format. Here, let’s assume we save the repositories data in JSON format in a data file, providing some mainstream open-source automation testing frameworks:
| |
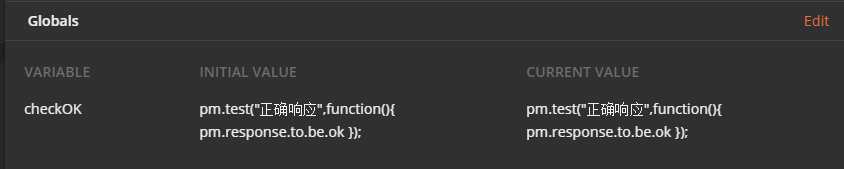
Write validations in the Test script. In the previous lesson, we mentioned a technique: for scripts that are used repeatedly, we can save them to global variables and execute the content of this variable when needed. In this example, all the APIs we need to execute will use the validation of whether a successful response is correctly returned. So we can set a global variable checkOK. The variable value is the validation script to be executed:
Different APIs all contain the corresponding repo information as path parameters, and then we add the corresponding validations:
- Get repo API
/repos/:owner/:repo
| |
- Get Contributor API (since the API returns 30 by default, here we use the
per_pageparameter to specify 100 items per page)
/repos/:owner/:repo/contributors?per_page=100
| |
- Get Tag API (since the API returns 30 by default, here we use the
per_pageparameter to specify 100 items per page)
/repos/:owner/:repo/tags?per_page=100
| |
- Get Topic API
/repos/:owner/:repo/topics
| |
Set up Runner configuration in Postman and run:
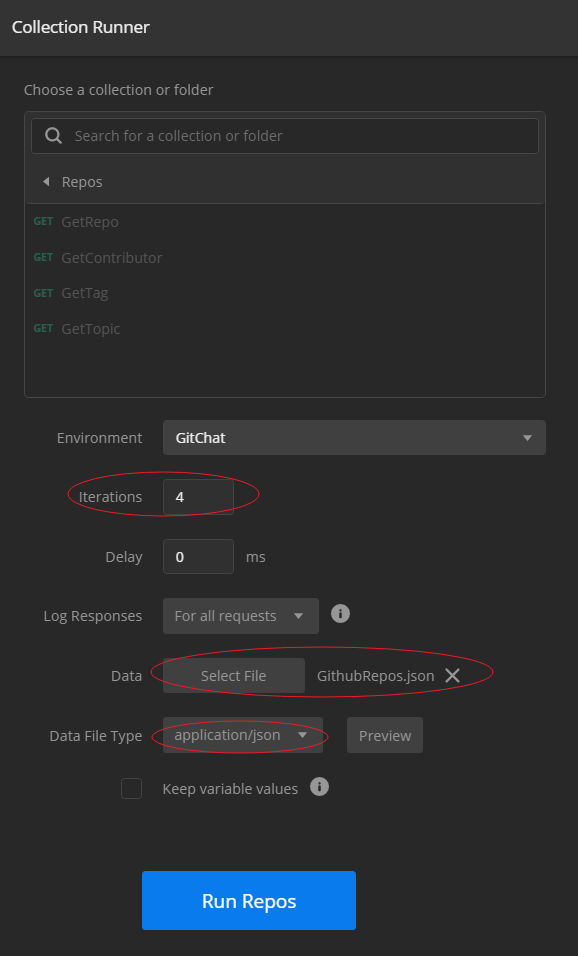
The result is shown below:
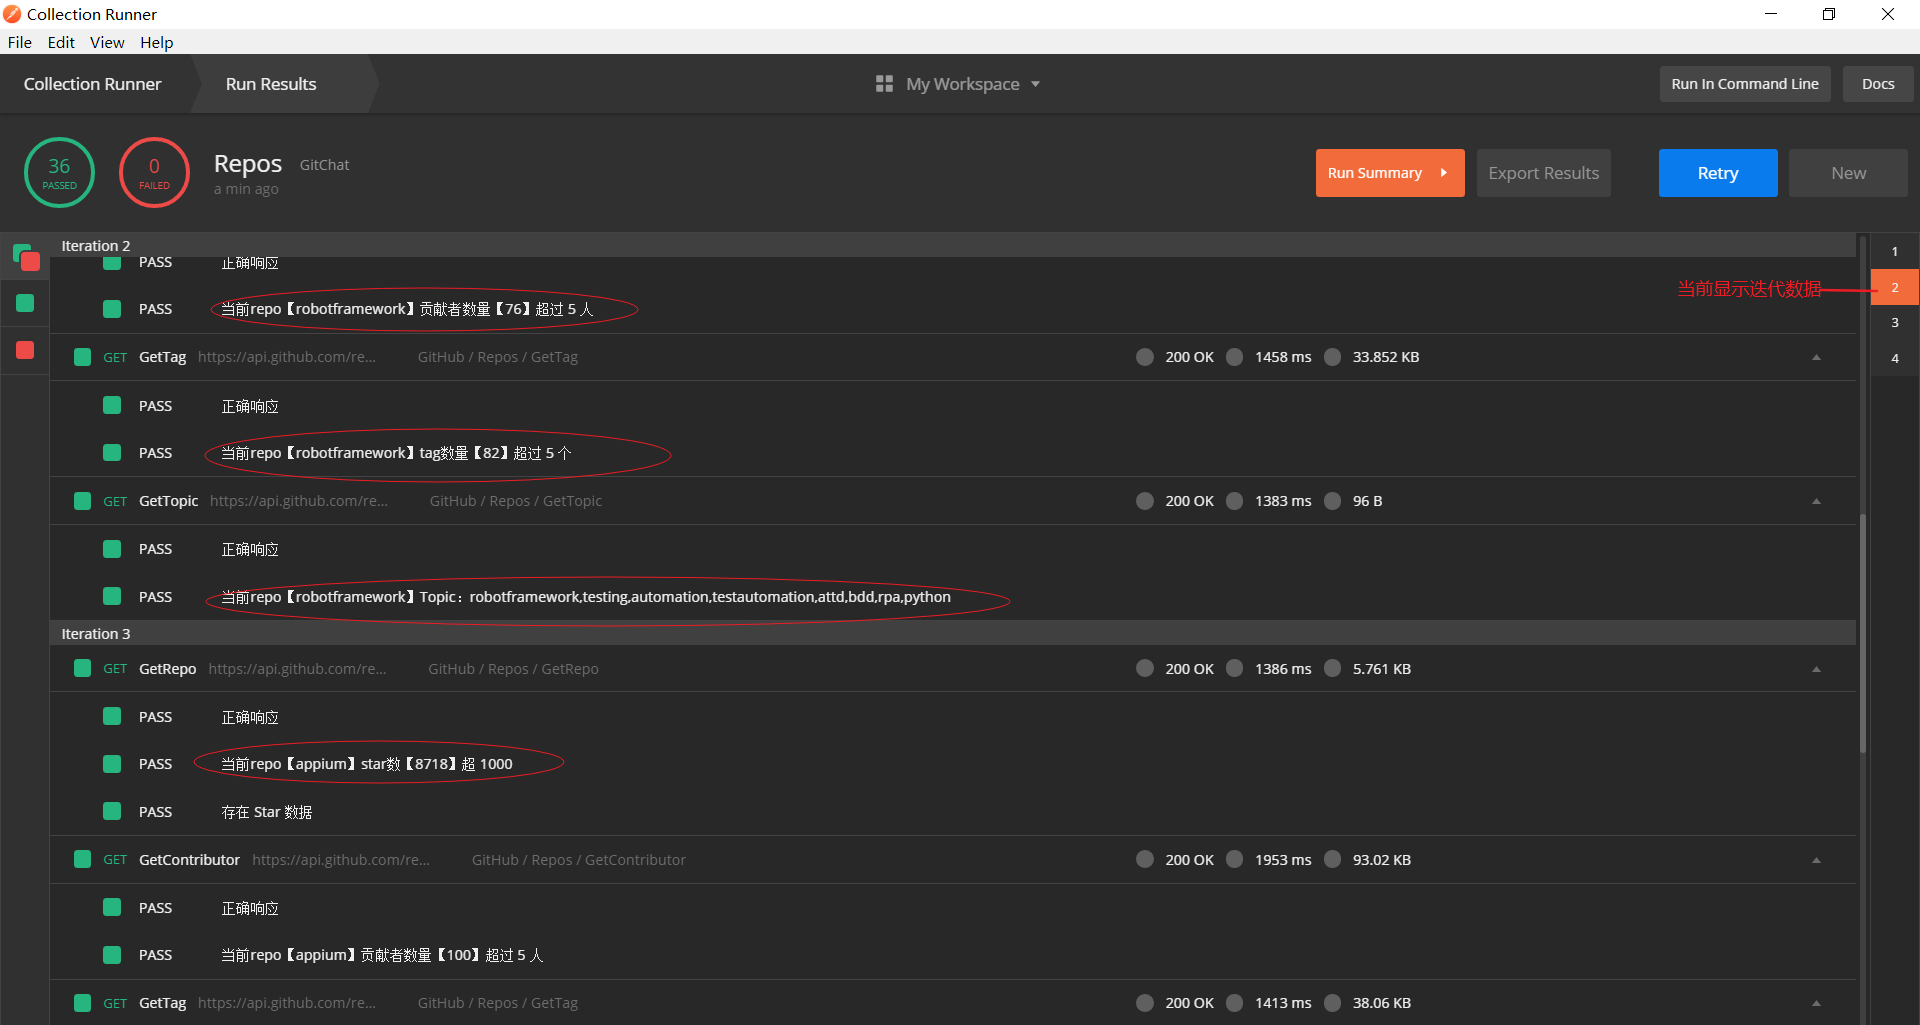
From the results, we can see that all the Repo information defined in the GithubRepos.json file has been correctly executed according to the above process.
Newman Command Line Tool
Postman’s Runner module provides a good way to execute API test cases in batches, but it still requires manual operation through the Postman interface. For automated testing, we need to be able to execute test cases through command-line tools, which can be integrated into CI/CD pipelines. Postman provides the Newman command-line tool for this purpose.
Newman Installation
Newman is a command-line tool based on Node.js. To install it, you need to have Node.js installed first. Then you can install Newman globally using npm:
| |
After installation, you can check if the installation was successful by running:
| |
If the installation is successful, it will display the version number of Newman.
Newman Usage
To use Newman, you first need to export your Postman Collection and Environment files. In Postman, click on the Collection you want to export, then click the “…” button and select “Export” to save the Collection as a JSON file. Similarly, you can export the Environment file.
Then you can use Newman to run the Collection:
| |
If you need to use data files for data-driven testing, you can use the -d parameter:
| |
Newman also supports many other parameters to customize the execution process. For example, you can use -n to specify the number of iterations, use -g to specify a global environment file, etc. For more details, you can refer to the Newman documentation.
Newman Report Generation
Newman can generate various formats of test reports, which is very useful for CI/CD integration. By default, Newman outputs the test results to the console, but you can also generate HTML, XML, or JSON reports.
To generate an HTML report, you first need to install the HTML reporter:
| |
Then you can use the -r parameter to specify the report format:
| |
This will generate an HTML report in the current directory. You can also specify the report output directory using the --reporter-html-export parameter:
| |
Similarly, you can generate XML reports (useful for integration with Jenkins) or JSON reports.
Newman Integration with CI/CD
Newman can be easily integrated with various CI/CD tools such as Jenkins, Travis CI, GitLab CI, etc. Here’s a simple example of integrating Newman with Jenkins:
- Install the “NodeJS Plugin” in Jenkins
- Configure a NodeJS installation in Jenkins
- In your Jenkins job, add a build step to execute a shell command:
| |
- Add a post-build action to publish the HTML report
This way, every time your Jenkins job runs, it will execute your Postman Collection and generate an HTML report.
Postman API Automation Testing Best Practices
Based on the above introduction to Postman’s automation testing capabilities, here are some best practices for API automation testing using Postman:
Organize your Collections properly: Group related APIs into folders, and use meaningful names for your Collections, folders, and requests.
Use Environment variables: Store environment-specific values (like base URLs, authentication tokens) in Environment variables, so you can easily switch between different environments.
Use Pre-request scripts for setup: Use Pre-request scripts to set up the necessary conditions for your tests, such as generating random data, setting variables, etc.
Write comprehensive Test scripts: Don’t just test for status codes; also validate response bodies, headers, response times, etc.
Use data files for data-driven testing: When you need to test the same API with different inputs, use data files instead of duplicating requests.
Implement proper error handling: Make sure your scripts handle errors gracefully and provide meaningful error messages.
Use Newman for CI/CD integration: Integrate your Postman tests into your CI/CD pipeline using Newman.
Generate and review reports: Regularly review test reports to identify trends and potential issues.
Keep your Collections and Environments in version control: Export your Collections and Environments and store them in a version control system like Git.
Collaborate with your team: Share your Collections with your team members and collaborate on API testing.
Conclusion
In this article, we’ve explored how to use Postman for API automation testing. We’ve covered Postman’s Runner module for batch execution, the Newman command-line tool for CI/CD integration, and some best practices for API automation testing.
Postman provides powerful capabilities for API automation testing, making it a valuable tool for testers and developers. By leveraging these capabilities, you can improve the efficiency and effectiveness of your API testing process.
In the next article, we’ll delve deeper into advanced topics in Postman, such as working with GraphQL APIs, WebSocket testing, and more. Stay tuned!